Thursday, April 21, 2016

Using the DosBox Debugger

It's up to the individual if you want to use a debugger when reverse engineering a program. Some prefer a more cerebral challenge of only figuring out code execution using a decompiler tool, whereas others may find using a debugger useful for figuring out what values are passed to functions. I would recommend using a debugger particularly when reversing a game for the purpose of adding ScummVM support. When you start implementing code to implement game functionality, once you've got portions of the game disassembled, it can be immensely useful for tracking down bugs. Particularly if you initially write your code with names that closely match the names you give the methods in the disassembly.
For debugging purposes, if the game is a DOS game, the DosBox Debugger is the best tool I've found for executing and debugging DOS programs. The default distribution of DosBox doesn't have it enabled, but you can either compile DosBox with it enabled, or download a previously compiled executable. See the DosBox Debugger Thread for more information.
One of the biggest initial steps when using the DosBox debugger is matching addresses in executable at run-time with your disassembly in IDA. This can be done either from the debugger to IDA, or from IDA to the debugger:

Sunday, September 16, 2012

How to Disassemble Setup.exe (Reverse Engineering)

A disassembler is a program that lets you look at a program's machine code while executing on a computer. Disassembly is a type of analytic procedure programmers use to view how a program runs in memory. Several programs let you disassemble a setup.exe file. Disassembling a setup.exe file allows you to see how the installation procedure runs on the computer. 


Instructions

    • Download and install the IDA Pro program by Hex Ray (see Resources). The program is a color-coded application that lets you discern between your setup.exe code and the Windows operating system code. The memory view shows you the executing code for the EXE file located in memory. The program also let you manipulate values and pause the execution of the file. This helps you test program options for your setup.exe file.

    • Download and install W32 DASM on your computer that has the setup.exe file on it (see Resources). W32 DASM is a free program, so it is good for people who are new to disassembling execution files and reading the code in memory. The interface is a single window that displays the code in each memory address. You cannot change the code in memory like you can with IDA Pro.

    • Download and install OllyDbg (see Resources). The OllyDbg program is a disassembler and a debugger. A debugger works with a disassembler to view the code in memory and lets you manipulate the code to find problems and errors in the setup.exe file. The OllyDbg program is open source, so you can also add open source modules or add your own add-on to the program.

How to Reverse Engineering

Introduction

This page is meant to provide some basic suggestions and strategies for people who are starting out with reverse engineering old adventure games, and aren't sure how to do it. It mainly focuses on resources and tools for reversing DOS game executables, but much of the strategies discussed may apply equally to other systems and debugging tools. This is only intended as an overview; you'll still need to read other resources to learn 8086 assembly language, and learn how to use the various tools effectively.

Resources

IDA Disassembler IDA is one of the best disassemblers available. And luckily, the freeware version works with old DOS executables. Even more so, the current freeware version supports viewing disassemblies in graph mode, making it easier to see the overall flow of individual methods.
DosBox Debugger The DosBox Debugger is an invaluable tool for running old DOS games, to monitor how the program executes, and what values are generated by the executing code.
XVI32 Hex File Viewer Although IDA has a built in hex viewer for the executable itself, the XVI32 tool is useful for viewing the contents of all the other files that come with a game. There are many different freeware hex editors available, so any other can be used just as easily.
Ralf Brown's Interrupt List A nice reference for the operation of DOS interrupts. In 8086 assembly, apart from directly accessing ports, using interrupts is the primary means of accessing system functionality such as opening files, changing graphics modes, and many other things.
8086 Assembly Language For those new to 8086 assembly language, you'll need a handy reference to learn the syntax. The Wikipedia is a good starting point, but you can also simply Google for an introduction as well.

Using the DosBox Debugger

It's up to the individual if you want to use a debugger when reverse engineering a program. Some prefer a more cerebral challenge of only figuring out code execution using a decompiler tool, whereas others may find using a debugger useful for figuring out what values are passed to functions. I would recommend using a debugger particularly when reversing a game for the purpose of adding ScummVM support. When you start implementing code to implement game functionality, once you've got portions of the game disassembled, it can be immensely useful for tracking down bugs. Particularly if you initially write your code with names that closely match the names you give the methods in the disassembly.
For debugging purposes, if the game is a DOS game, the DosBox Debugger is the best tool I've found for executing and debugging DOS programs. The default distribution of DosBox doesn't have it enabled, but you can either compile DosBox with it enabled, or download a previously compiled executable. See the DosBox Debugger Thread for more information.
One of the biggest initial steps when using the DosBox debugger is matching addresses in executable at run-time with your disassembly in IDA. This can be done either from the debugger to IDA, or from IDA to the debugger:

From the debugger to IDA

This is the easiest. If you break execution of the game at any point, you can simply use the Find Binary option in IDA to search for a sequence of bytes from the instructions shown in the DosBox Debugger disassembly area. Be careful to pick instructions that aren't far calls or jumps - such instructions are modified when a program loads depending where it loads in memory, so the IDA disassembly won't have the exact same bytes. If you do find a match, double check that the offset within the segment of the found match in IDA matches the offset of the instructions in the DosBox Debugger. If not, you may have found a false match, and should either search for the next occurrence, or specify extra bytes in your search until you find the correct match.

From IDA to the Debugger

If you have a point in the IDA disassembly and want to figure out what address it will be loaded in the DosBox Debugger, it's also not hard. This is presuming the game in question doesn't use Overlays. Overlays were a method developed when games and other applications became too big to fit into memory at once. In these cases, code for the program is often stored at the end of the executable, or in separate files, and loaded as needed into part of the memory, overwriting previously loaded code. In such situations, it becomes hard to pin down a specific section in memory a given segment will be loaded at, since it may shift around in memory over the course of the program running, as it gets loaded, overwritten, and loaded again repeatedly.
So long as the game doesn't use overlays, the following steps can be used:
- look at the IDA view to find out the current file offset at the bottom of the screen. You'll quickly find it if you try selecting different instructions, since it will keep changing. Now:
- Get the value from the beginning of the current code segment. This is just to make the calculations easier, since the start of the segment will have an instruction offset between 0h and 0Fh, which means it won't be messing with our segment calculations
- Get the value from the beginning of the entire disassembly.
- Drop the last digit from both values, and get the difference between the two.
- For executables run in DosBox, add a value of '0138h'. For COM files, add a value of '0128h'.
This will give you the segment address of where the segment should be under DosBox. In either case, it's generally a good idea is to then rename the current segment in the IDA disassembly so that it includes the actual segment address of where it was loaded in DosBox.
For example, the first segment of executables is normally loaded at segment 0138h in memory, so you might rename the segment 'sg0138'. That way, if you later want to set a breakpoint in the DosBox Debugger for any instruction in the segment, you will immediately know what the segment is.

Using IDA Effectively

One of the best things to do when disassembling a game is to document everything. Particularly method parameters and structures.

Naming Methods

Methods can be renamed using the general 'N' hotkey (as well as via the menus), and the 'Y' can be used to specify a C-like prototype for a method. This is particularly useful when some of the parameters for a method are passed using registers. By explicitly documenting what the method expects, it makes it easier to remember later on when you're reversing methods that call it. Standard methods where parameters are passed via the stack are easy, since IDA can automatically set up the function prototype for you. If a method does have parameters passed in registers, prototypes like the below can be used:
int __usercall sub_100FB<ax>(__int8 param1<al>, int param2<bx>)
In this case, the method takes an 8-bit parameter in the al register, and another 16-bit value in bx, then returns a result in ax

Using Structures

The other thing you'll need to learn to use IDA effectively is the use of structures. Irrespective of what language a game was originally written in, there will always be structures containing related information. It may be something as simple as a C-style struct, or could even be the fields of a class in C++.
When dealing with data, you'll frequently see cases like
mov bx, 30h
mul bx
mov ax, [bx+2D00h]
In this case, an initial index in the ax register is multiplied by 30h (30 hexadecimal = 48 decimal). So from this we can determine that the given structure is 48 bytes in size, and can create a new structure accordingly. For smaller sized structures, you may want to create as many 2 byte word fields as needed to make up the correct size for the structure. For larger sizes, the easiest way is to simply declare an array of the needed structure size - 1, and follow it with a single byte field. You can then delete/undefine the array. The remaining byte will keep the structure at the correct size, and you can then later fill in the fields as you find references to them.
Secondarily, the value of '2D00h' indicates an offset in the data segment, representing the rough starting address of the first element of the given array in memory. Here we run into a minor problem. The offset of '2D00h' may not indicate the precise start of the array. If the code in question wanted to get the value at offset 8 in the structure, then the array may actually start 8 bytes earlier in memory, at address '2CF8h'.
In such cases, the only way to tell for sure is to start searching for immediate values in the program of values bytes backwards at a time, until you can't find any more values. For example, if you find references in the code of values '2CFFh', and '2CFEh', each with previous multiplications by 30h/48, but none for '2CFDh', '2CFDCh', or '2CFBh', then you can probably be confident that the array starts at offset 2CFDh.
Once that's determined, you can then create a dummy structure of the correct size, and convert the given address of 2CFDh to an instance of that structure type. Until you're more familiar with the range of values the original array index may be, it'll likely be easier to simply leave the defined array with the single index. Later on, you can always change the structure in memory to specify how many elements it has later on.
Remember that fields in structures can vary in size, so it's always possible you'll get the starting address wrong. In which case, you may have to later on correct the address of the structure in the data segment. This will affect any fields you figure out as well. In the above example, if you mistakenly presumed the array started at offset 2CFDh, then 2D00h would be thought to be a field at offset 3 in the structure (2CFDh + 3 = 2D00h, as per the above example code fragment). However, if the array structure really starts at 2CF8h, then the same field should be at offset 8 within the structure (2CF8h + 8 = 2D00h). So you need to rebuild the list of fields you'd figured out in the structure, since they'll all be at the wrong position. Overall, it's better when encountering an array to spend the extra time to ensure where it starts in memory so you don't need to fix offset problems later on.

Disassembly Strategies

One of the hardest things when starting work on a new disassembly is to figure out how to begin. The following are offered as suggestions of how to get started in the disassembly process.

File Access

One of the easiest places to start a disassembly is generally by identifying file accesses. Using IDA, you can, for example, do a text search for 'open', 'read', 'close', etc. to find occurrences of file opening. IDA provides standard comments for many operating system calls, so even in a new disassembly you should be able to locate such calls by their comment text. Likewise for file reading, writing, and closing. Normally, a program will encapsulate these calls into a method of it's own, so your first disassembly step can be in identifying the methods and naming them appropriately with names like 'File_open', 'File_read', and so on. Likewise, giving the passed parameters an appropriate name. In IDA, the 'Y' command can be used to set up an appropriate method signature for methods. By properly naming the method and it's parameters, this will help you in all the methods that call those methods.
For example, if a read method has a 'size' parameter and a 'buffer' parameter, then if a method that calls it passes '200' for the size, and a reference from a location on the stack, you can be confident that the stack entry can be called something like 'readBuffer', and use the '*' (array size) key when looking at the Stack View (Ctrl-K) to set the size of the array to 200 bytes.
You should hopefully then be able to start working on methods that call the file access functions and hopefully start decoding them. Some examples:
1. If the game consists of only a few large data files, the methods that call the open/read/close functions may a resource manager responsible for loading subsets of the file. In which case, the methods may likely load some kind of index into memory and then have a separate 'get resource' method that scans through the list for a resource with a given Id, resulting in a specific portion of the data file being read. In this case, you can identify all the methods with appropriate names like 'ResourceManager_init', 'ResourceManager_loadIndex', 'ResourceManager_getResource', and so on.
The DosBox debugger may prove useful when dealing with games using large resources. In DOS, Interrupt 21h is one of the primary system interrupts. Specific command Ids are passed in AH, and the other registers are set with values depending on which function is being called. For example, command 42h of Interrupt 21h is the command for seeking within a file. Try using 'BPINT 21 42' to put a breakpoint on any calls to seek system function. By clearly identifying the 'Seek method', you can then step out of that routine to find what called it. Hopefully, you can then examine the logic in the disassembly used to generate the file offset to help you figure out how file offsets are generated for specific resources, and from that figure out how the resource's index works.
Remember that game resource managers not only typically merge multiple individual resources into one single bigger file, they frequently also compress them as well, to save space and prevent people from seeing textual resources when viewing the contents of the file. In such cases, if you can figure out the strategy used for extracting single resources, it may be worthwhile taking the time to code a standalone program to extract and, if necessary, decompress single resources into separate output files. That way, you can more easily look at individual resources that are used by the game without having to worry about manually locating them in the archive/resource file.
2. If the game consists of many different files, it's likely the game will be manually calling the open/read/close methods whenever it wants to access a particular file/resource.
In either case, figuring out the file access routines will give you an excellent start into figuring out the contents of the game; you can then move onto methods that call the resource manager get resource method, and start looking at what kind of resources are loaded, and from there start identifying methods that make use of those resources.

Graphics access

Another place to get started on the disassembly is the graphic draw routines, those responsible for copying raw pixels to the screen surface.
Graphic display was complicated in the early PC days by different modes for the different graphics cards writing to memory in different ways. In the Monochrome/Hercules mode, for example, 8 pixels are stored per 8-bit byte. In EGA, the addressing can be complicated by how the display is configured - the same areas of memory may be used to represent different parts of pixels - with the part of a pixel being updated depending on specific values sent to hardware ports. Finally, of them all, the most common 320x200x256 colour mode is the easiest to deal with, with each pixel taking up a single byte.
For most of the graphics modes, you can look at them in a similar manner - as a block of data in memory starting at offset A000h:0. Only the number of bytes per line will vary, depending on what the graphics mode is. Assembly routines that deal with the graphics screen will typically have code to figure out screen offsets based on provided x and y parameters, so it will frequently be easy to identify the parameters and figure out how the screen offsets work. For example, in 320x200x256 MCGA mode, an offset on the screen will be calculated using the formula (y * 320) + x.
For finding the graphic routines you have two options:
The first is to entirely use IDA, and simply search for immediate values of 'A000h'. Since this is the area of memory that graphics are commonly displayed in, it can be a quick way to locate graphic routines.
The other alternative is to use the DosBox Debugger. It has a use command called 'bpm' that allow you to set a memory breakpoint, which then gets triggered if the given memory address changes. So you could do 'bpm A000:0' to set a breakpoint on the first byte of the screen memory (i.e. the top left hand corner of the screen). Then whichever routine modifies it first will trigger the breakpoint. Using the previously discussed techniques, you can find the same place in your IDA disassembly, and look into reversing that method first.
It will be likely that related functions will be next to each other, so once you've looked into the given identified function, you may also be able to review previous or following functions to see if they have identifiable graphic routines.

Data Segment strings

The strings in the data segment can be an excellent source for identifying the purposes of various methods. If you're very lucky, there may be error messages that contain the name of the function as part of the error. In which case, you can then find out what code references it, and name the methods appropriately.
Note: IDA is good, but it's not perfect., It's not always guaranteed to be able to figure out that a given value loaded into a register somewhere in the program is for a reference into the data segment. As such, if the cross-reference command doesn't give any references for a given string, try searching for an immediate value of the offset of the string. Chances are, any reference you find is likely pointing to the string. You can then use the 'O' command to change the operand from an immediate value to instead point to the offset in the data segment.
Even if any error messages don't contain method names, an error message can prove invaluable. For example, an error message like "Unable to initialise mouse" tells you that whatever method uses it is setting up the mouse for access, so could be given a name like 'initialise_mouse', or 'initialise_events'.
Likewise, have a look at the context of what needs to happen for the error message to be printed, since the message can give you insights into what is being done. A message like "No more free inventory slots" tells you that the code that references this error message is likely a routine for adding an item to the inventory (hence the error if no more slots are available). From there you might be able to identify the area of memory containing the inventory list, and then cross reference other methods that also access it - you could end up identifying a whole group of methods related to inventory manipulation.
Another possibility for data segment strings is to pick strings that may be descriptive enough to guess their purpose. For example, if a string has a name like 'FNT20', or 'UI.FNT', it's likely that it's a font file, containing the images for each character for use in displaying on the screen. In that case, any code that references it is likely to be passing it to a 'font_open' function, which loads up the font. If you can disassemble that method, you may be able to determine how the loaded font is stored in memory. From there, you can use the cross references function of IDA to find other methods that use the same memory address as where the font is stored, and which will likely give you the methods for actually displaying text on the screen.
From there, you may be able to go even further, and start figuring out methods that call the 'write string' function.. menus, hotspots, conversation handlers, and so forth.

Program execution

Another method for identifying methods may be simply executing the program itself. When running the program in DosBox, you may find it useful to start stepping through the main procedure to see what happens from stepping over every method. IDA may be helpful in identifying the main procedure, but even if not, most programming languages have a series of method calls for setting up the initial application state,and then a single final call to the 'main' method.
With the main method identified, stepping over each method may produce interesting results. For example, stepping over a single method call may run all the code for showing the game's introduction sequence before returning control to the debugger. If this can be identified, you could name the method appropriately. You may then be able to gleam information from how the method is called and for the method itself:
For where the method is called, there may be conditional checks to see whether the method is called or not. For example, some games may have a stored settings file to flag whether the introduction has been shown, and not show it again after the first time the game is played..
In that case, a method call just prior to the method call to show the introduction may be for reading in the game settings and checking the flag for whether the introduction has been shown. Knowing this, you could name multiple methods for reading settings, then within it file opening and reading, and so on.
Within the method itself, you may likewise be able to figure out further specific details of how the method is implemented from the method calls it makes. For example, a 'play introduction' method may consist of calling the same method multiple times with different parameter values. These values may well be offsets within the data segment for resource or file names for specific animations to run. In which case, you now know the sub-method is an animation player, and name it accordingly. You could then start work on the animation player, figuring out how it loads it in data, and what method it uses to build up and display graphics on the screen.
Particularly for cases like that, identifying and naming the graphic/screen methods may be helpful, since you could work the disassembly from both the front end reading the animation, and from the low level drawing of the graphics of the animation.

Final Words

Reverse engineering a game can be a rewarding experience, but plan to spend a lot of time working on it. Reverse engineering a game can take months, even years for really complicated games. As you gradually start figuring out sections of the original game, it may prove helpful to dive into creating the engine in a fork of the ScummVM code. Re-implementing things such as resource managers, and file access, it may help you figure out the purpose of other methods more easily if you can see what the code you implement does, and thus get a better idea of what kind of data will be passed to other methods you haven't yet figured out.

Tuesday, September 11, 2012

SkyDrive expands developer APIs: app pickers, full resolution images; and you can share via SkyDrive in Gmail!

SkyDrive continues to open up its platform to developers of all types, announcing today in a blog post that Attachments.me (a service that saves and retrieves Gmail attachments to Dropbox, Box, and Google Drive) has added SkyDrive to the list, and promoting some new features making it easier for web developers to use SkyDrive.

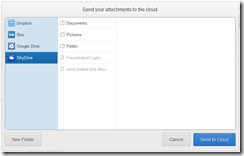
Attachments.me, via a Chrome extension, has added SkyDrive to its list of save locations:

attachments me2


SkyDrive is at TechCrunch Disrupt this week, promoting SkyDrive, and is promoting some additions to the SkyDrive APIs that were announced last month.

Specifically, SkyDrive has added an app picker for web developers using their Javascript API, making it as easy to add a file picker to a web page as it is to a Windows 8 app:
Shortly after we launched the SkyDrive API, we began to get feedback from web developers about how difficult it was to actually integrate opening or saving files to SkyDrive. And at the same time, developers were finding this very easy when building Windows 8 apps. The key problem was that app developers would need to re-implement the SkyDrive file picker to create a great experience when accessing or saving files to SkyDrive.
To address this feedback we’ve created a SkyDrive file picker for web apps. The SkyDrive file picker makes it easy easy to give your website the ability to open and save files to SkyDrive with just a few lines of JavaScript code.
and now allows full resolution images to be programmatically stored on SkyDrive:
By default, if an uploaded photo is larger than 2048 × 2048 pixels in size, SkyDrive automatically tries to shrink it so that it fits within this 2048 × 2048 pixel size constraint. We think that provides a good default balance between a high quality picture but also not using up tons of storage. But there are times you really want the full resolution, and so you override this behavior when using the SkyDrive REST API.
If you’re a developer looking to use SkyDrive in your apps, check out the Live Interactive SDK on dev.live.com, which includes SkyDrive, Identity, Hotmail, and Messenger APIs.

YouTube launches new iPhone app ahead of iOS 6 release

New version will include access to thousands of additional videos, notably major-label music videos, which is made possible with now-allowed advertising.


Days before iOS 6 lands on iPhones without the familiar pre-installed YouTube app, Google has released a new version with some significant upgrades. (Grab the app here.)


Tens of thousands of additional videos can now be played through the iOS app, notably major-label music videos. That will be made possible by advertising, which was forbidden in the original Apple-designed app. The new YouTube also includes an easier way to browse any channels you've subscribed to -- just swipe right from the left side of the screen to see a list of them -- and new options for sharing videos with friends, including Facebook and Google+.

Last month, a new beta release of iOS removed the YouTube app, which has been a part of Apple's mobile operating system since the original iPhone launch. Apple said at the time that its license to include YouTube had ended and that users would be free to access YouTube via the mobile Web or a forthcoming app that YouTube was building itself. That app arrives today.

For YouTube, breaking with Apple meant a chance to bring the slick, modern experience it built for Android devices to hundreds of millions of current and future iPhone owners. YouTube had little control over the app that bore its name for the past five years; Apple built the app itself according to YouTube's instructions but updated it infrequently. The ban on advertising made it difficult to access copyrighted content inside the app; many a music fan went looking for a Lady Gaga video over the years on iOS and came up empty.

The new YouTube app makes it easier to find major-label music videos, which will be supported with advertising. 

(Credit: YouTube)
"Over the years that resulted in a more limited experience for our users, and lots of frustration," said Francisco Varela, global director of platform partnerships at YouTube. "We're going to get rid of that."

Varela then put it another way: "You're now going to be able to watch your Lady Gaga video on your phone."


A changing relationship
The original deal between Apple and Google on the YouTube app helped remake video for the mobile world, as the iPhone's lack of support for Adobe Flash meant YouTube's catalog had to be re-formatted to work in HTML5. The iPhone's popularity helped make MP4 format the standard format for mobile video. Over the years, it became less important for Apple to have a dedicated app for finding videos that would play on its phone.

At the same time, the Apple-Google relationship has soured considerably since the launch of the first iPhone. Apple co-founder Steve Jobs took Google's development of its own mobile operating system, Android, as a great affront -- and an infringement on Apple's intellectual property. Patent lawsuits are now playing out around the world, and Apple has made a series of moves this year to push Google out of its operating system.

At its Worldwide Developer Conference, Apple showcased a new maps application that will replace the Google-powered app now in use on iOS devices. Removing YouTube from the list of pre-installed apps marked the next step.

But for Google, the YouTube break could represent a significant revenue opportunity. The company says its users watch 1 billion videos a day on mobile devices; enabling ads on their iOS app will help the company reach a large new audience.

How much advertising should users expect? Varela said it will be roughly similar to using YouTube on the Web. 

"It's really up to our content owners what they want to do," he said. "But we're not looking to overwhelm."


Not done yet
What's next for the YouTube app? The company is already hinting at some big new features to come. For starters, an iPad version is in the works. YouTube also wants to make movies and TV shows purchased through the Google Play store available on the iOS app.
For now, though, YouTube needs to educate its users that they can no longer rely on Apple to put its app on their iPhones for them. For now, they don't seem worried about it.
"We fundamentally changed the mobile ecosystem with our original partnership," Varela said. "This is just the next phase of it."

Monday, September 10, 2012

How to Recover Windows 8 Password

"I forgot my windows 8 password on my computer. Can anyone give me some tips to help me recover the lost password?"

When you forget your windows 8 login password, you can use Windows 8 password recovery tool to recover it. If you have ever enabled the hidden administrator account on your computer, there is a best way for you to recover the lost password.

First you need to prepare a password recovery disk burned from a Windows password Recovery program. Pakeysoft Windows Password Recovery can be a good option, which can help you access your computer and let you remove the password. Not only for Windows 8, this program also works well on Windows 7, Vista, XP, 2008, 2003 and 2000.


Download Pakeysoft Windows Password Recovery from here

Step 1. Burn a bootable Windows 8 password recovery disk


After installing the program on your computer, run it. And you'll get the interface as follow.


windows 8 password recovery


Then insert a blank CD/DVD or USB flash drive to your computer, and then select your target devices. Click 'Burn to CD/DVD' button or 'Burn to USB' button to start burning.

Step 2. Boot your computer with the Windows 8 recovery disk

To set the computer to boot from CD/DVD-ROM, please refer to How to set computer to boot from CD/DVD-ROM.

To set the computer to boot from USB drive, please refer to How to set computer to boot from USB drive.

Step 3. Recover Windows 8 password

After booting the windows 8 password recovery disk correctly, you are able to recover Windows 8 Administrator Password and other acount password for Windows 8 system.
Select the user name of your target account, and then click "Reset".


recover windows 8 password


Now take out of the disk and restart the computer. Then you can access your computer without being asked for any password.


As You can see, all the process is very easy and quickly! you can free download the trial version of Pakeysoft Windows Password to try to recover lost Windows 8 password.

How To Hack Windows 8 Admin Password: Step by Step

How To Hack Windows 8 Admin Password or Login Password, Previously I already make a post about How To Hack Windows 7 Admin Password Now I am telling you how to hack Windows 8 admin or login password ,the process is quite same. This method is great if you forgot your Windows 8 admin or user password as you can easily change with new one. Don't need to be panic that you forget password. 

Its also good if you want to do some spy on your friend's PC as you hack or crack your friend's Windows 8 PC and change the old password and set a new one, so when he/she will access his/her Windows 8 computer will see that wrong password. Whether you are using Windows 8 developer preview ,consumer preview , release preview or RTM version its work fine. So how to reset or crack Windows 8 password  , lets follow me


Step 1. Get a Linux Live Cd

Step 2. Boot the cd

Step 3. Go to C:\Windows\System32

Step 4. Rename "Utilman.exe" file to "Utilman1.exe"

Step 5. Now rename "cmd.exe" file to "Utilman.exe"


Step 6. Restart your PC and remove the cd

Step 7. Now you will a screen like this that is normal


Step 8. Now click on "Ease of access"(left bottom corner of the screen) and  cmd.exe will pop up like this


Step 9. Type "net user",without quotes in command prompt it will show all users list

Step 10. Now you have to add a new user so type
net user /add cyberkey ck
here your new username is "cyberkey" and its password is "ck"

Step 11. Now you have to make this user as a administrator ,so type
 net localgroup administrators cyberkey /add
Step 12.Restart your pc, and login with your new user here its "cyberkey" , give the password "ck".

Step 13.Now its done ,now you may delete your old user account or change its password from control panel
Step 11.But that's not end, your PC is to totally correct , to make it correct again boot with your Linux cd and go to C:\Windows\System32 folder , now rename "Utilman.exe" to "cmd.exe" and now rename "Utilman1.exe" to "Utilman.exe". That's End.If you like it the share it.

Reset Windows 8 Password Step by Step

How to reset Windows 8 password?

Have you ever forgotten Windows 8 password? Did you take much time in looking for information online about how to reset Windows 8 password? However, the information should be few but useful. The following article is the one. Read it carefully and learn how to use Anmosoft Windows Password Reset to recover Windows 8 password easily and instantly. Let's look at the simple steps:


Step 1 Create a Windows 8 password reset disk with CD/DVD or USB drive
Step 2 Reset the forgotten Windows 8 password

Step 1  Create a Windows 8 admin password reset disk with CD/DVD or USB drive

1. Download and install Anmosoft Windows Password Reset on a workable computer. Insert a blank CD/DVD or USB drive into the computer and run the installed program.
Note: Backup your important data and files if the CD/DVD or USB drive is not blank.

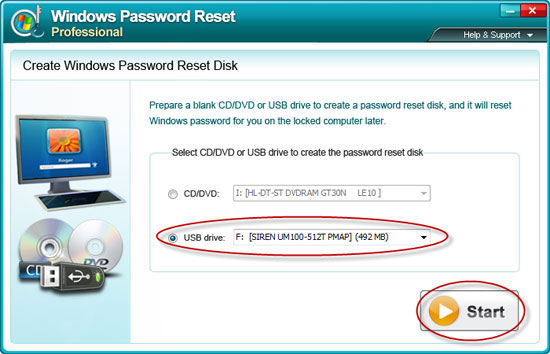
2. On the start page, choosing the device which you have inserted to burn a Windows 8 password reset disk. Then click Start.


Windows 7 password reset disk


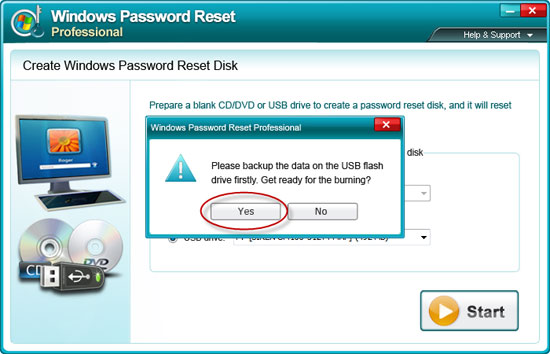
3. Click Yes to confirm burning a Windows 8 password reset disk.


burn Windows 7 password reset disk

4. Click Close after the disk is burned successfully.

Step 2 Reset the forgotten Windows 8 password

Insert the burned CD/DVD or USB drive into the locked computer and restart. It should be noticed that your locked computer should boot from the disk. If the computer cannot boot from it, please set BIOS to boot from CD/DVD or USB flash drive.


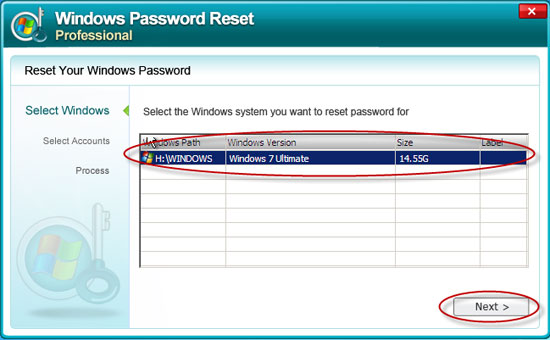
1. Select the target Windows system, then click Next.


Windows 7 password recovery

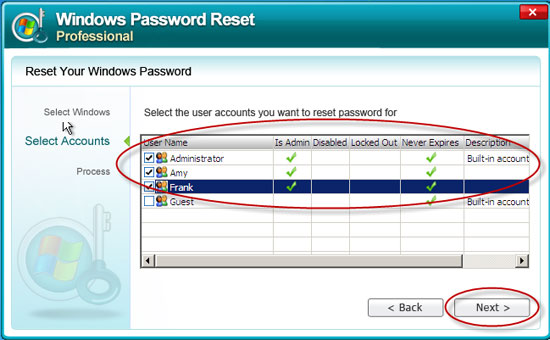
2. Choose the user accounts you want to reset password for, click Next to advance the Windows 8 password recovery process.


remove Windows 7 password

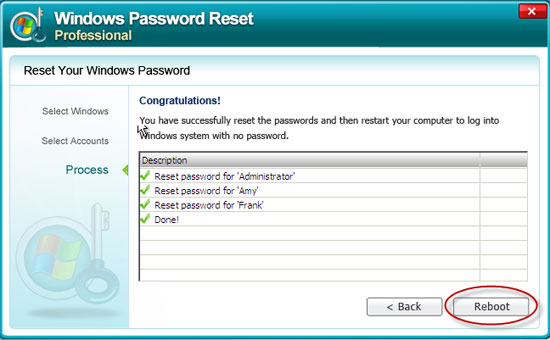
3. After interface reminds you password is reset successfully, take out the disk, and click Reboot to restart the computer. You can log in the Windows system without passwords.


reset Windows 7 password success

Anmosoft Windows Password Reset—excellent Windows password recovery tool!
Only two steps is needed to reset Windows 8 password by using Anmosoft Windows Password Reset. Besides, the software is also adopted to recover passwords on Windows 7/Vista/XP/Server2008/ Server 2003/ Server 2000 etc.
Four different versions of Anmosoft Windows Password Reset all work well in Windows password recovery for all brands of Laptops (notebooks), Desktops, such as HP (Pavilion), Dell (Inspiron), Lenovo, ThinkPad, Acer, Asus, Compaq, Toshiba (Satellite), Benq, Sony, Samsung, Fujitsu, Hitachi, NEC, Gateway etc. >> Edition compare

Such a multifunctional and powerful Windows password recovery tool definitely deserves your attention and use when you forgot Windows 8 password.


Installing Lazarus on MacOS X (Step by Step)

Installation

This document describes installation on Apple Mac OS X desktops/laptops.

Apple Developer Tools

You need the Apple Developer tools. They can be installed from the original Mac OS X installation disks or downloaded from the Apple Developer Connection (ADC), which requires free registration: http://developer.apple.com/.

Install Packages / Released version

Installation from disk images

Download the three disk images (.dmg files) for fpc, fpcsrc and lazarus from either of the following links:
Open up each disk image and install in this order: 1. fpc 2. fpcsrc 3. Lazarus
After installation the Lazarus application can be found in /Developer/lazarus/, the FPC source files in /usr/local/share/fpcsrc.
If you receive a "Can't find unit Interfaces used by Project1" error on trying to compile a blank form, check the following settings in Lazarus (should be set by default):
Environment | Options
  Lazarus directory: /Developer/Lazarus
  Compiler path: /usr/local/bin/ppc386 (PowerPC Macs: /usr/local/bin/ppcppc)
  FPC Source: /usr/local/share/fpcsrc
Project | Options
  All paths blank
  LCL Widget Type: default (Carbon beta)
Project | Inspector
  Required Packages
     LCL

Note - different versions of Lazarus depend on particular versions of the FreePascal compiler and will not work with other versions.
Another common problem is that the versions of fpc and fpcsrc are different.
This is the easiest way to install Lazarus on Mac OS X.

Installation using fink

To obtain the up-to-date release versions of lazarus (0.9.30) AND freepascal (2.4.4) use fink, a package manager for Mac OS X. The extra bonus of fink is easy installation as well as clean removal of a huge number of other open source software packages, including FreePascal crosscompilers for other processors and systems. The choice for lazarus is between an Aqua (preferred by most) and a gtk2 look of lazarus:
$ fink install lazarus-aqua
or
$ fink install lazarus-gtk2
This also installs a number of other packages, such as the FreePascal compiler, the lazarus sources, gtk2 libraries and more. At the prompt, whether you want to install these additional packages, simply hit RETURN and go for a coffee. It really takes some time to build all packages, in particular on older Macs.
After installation, Lazarus can be started from the folder /Applications/Fink/. The actual details of fpc and lazarus are in subdirectories of /sw
With both (Aqua AND gtk2) looks, these widget sets for your program are supported on Intel- and PowerPC-Macs:
carbon (Aqua), gtk2, nogui
On Intel-Macs these additional cross platform widget sets are supported:
carbon (Aqua) for powerpc, win32 and wince.
Projects with the gtk1 widget set are also supported on 10.4 and 10.5 through the lazarus-common-gtk1 package. On 10.6, gtk1 libraries are deprecated in general and you have to port your project to the gtk2 or carbon widget set.

Installation using SVN

To get the current development version see below.

Install from Source / Development version

You need the latest stable released FPC installed in order to compile the development version.

Download and install a compiler

Download and install the FPC package: https://sourceforge.net/project/showfiles.php?group_id=89339
There are two development versions of the compiler: 2.6.x is stable version without new features - only bug fixes. The unstable version 2.7.x comes with lots of new features but sometimes also with bugs. Best is to download and install fpc 2.6.x. Some daily snapshots can be found here. Keep in mind that these are daily snapshots and that you can have bad luck and get a buggy version. The probability is about 1:30. So if the version is buggy try another day or use the released packages instead.

Download the sources via svn

  • Note: IF the current SVN of FreePascal can not be compiled using the stable release of FreePascal that comes with the current stable version of Lazarus (FPC 2.6.*), you will need a newer compiler. In order to compile the latest versions of FPC, first install a precompiled 2.6.* series compiler. You can get a compiled version of FPC 2.6.* at http://www.freepascal.org/download.var. Note: only do this if the instructions below do not work.
The sources are kept in a version control system called subversion or short svn:
  • 10.5 and higher already contains svn clients. Users of earlier versions must install SVN for Mac OS X. A good package is provided by Martin Ott. You can also use fink. SVN clients with GUI (graphical user interface) are available from Versiontracker. A quite handy client, which integrates in Finder, is SCPlugin.
Create a directory, where you would like to put the sources. You don't need to be root to do this. Any normal user can do this. First create a directory for fpc
(e.g. /Users/username/freepascal)
then open a terminal and do the following:
This will create a directory called 'fpc', which can be later used in the IDE. Hint: To download/update the latest changes you can simply do
[]$ cd /Users/username/freepascal/fpc
[]$ svn up
Building fpc
[]$ make clean all
[]$ sudo make install
Then download lazarus
This will create a directory called 'lazarus'. To update the latest changes:
[]$ cd /Users/username/freepascal/lazarus
[]$ svn up
Building lazarus
[]$ make clean all
Then start lazarus either via command line or by double click in the finder:
 open lazarus.app

Known issues

  • FPC 2.4.4 has a bug. You can not compile the IDE with the range check flag -Cr.
  • On OS X 10.4 you have to manually uninstall any previous version before installing a new dmg. Delete the following files and folders: 
    • /Developer/lazarus
    • /Library/Receipts/lazarus.pkg
    • /etc/lazarus
    • /usr/local/bin/lazbuild

First Steps

The carbon interface has matured and is probably preferred over the gtk2 interface by most users of lazarus:
  • The carbon IDE looks somewhat nicer, although autosizing does not yet work correctly. Therefore, some dialogs look pretty bad until you enlarge them manually.
  • Sometimes the blinking cursor vanishes after closing a file. Just switch to another page and back

50 Common Mac Problems Solved (Updated)

General Mac Problems


The Mac OS is, fundamentally, as trouble-free as operating systems get. But nothing's perfect. Here's what to do when you hit a snag.

1. I want a tabbed finder.

Download the incredibly versatile Path Finder ($40, www.cocoatech.com), which gives you all sorts of features that are missing from the Finder, such as tabs, stacks, bookmarks, and panes. Sounds like fun to us!

Now THIS is the Finder we've always dreamed of. Thanks, Path Finder!


2. I can't print anymore.

This could be caused by a variety of different issues relating to your printer hardware or printer drivers, so you may need to contact the printer manufacturer for more help. But if your Mac is causing the problem, it’s always a good idea to reset your entire printing system by going into your Print & Fax System Preference, right-clicking in the printer list, and choosing Reset Printing System.

3. I travel all over town with my MacBook, and I’m sick of reconfiguring my settings every time I show up at a location I’ve been to before. Why can’t my Mac remember various location settings for me--my default printer, mounted servers, iChat screen name, Bluetooth settings, everything?

Try NetworkLocation ($29, www.networklocationapp.com), which can perform dozens of actions on your Mac whenever you switch to a new location. Best of all, its AutoLocate feature will determine where you are, using the same SkyHook Wireless Wi-Fi Positioning System that your iPhone uses, and it will automatically change all of your settings for you. 


If you frequently switch physical locations, NetworkLocation can save you both time and headaches changing your Mac's settings.

4. I forgot my OS X password.

After retyping your password very carefully at least twice to make sure you just didn’t mistype it, you’ll need to haul out your OS X install disk, insert it into your Mac and restart holding down the C button. After selecting your language of choice, in the menubar, select Utilities > Reset Password. Follow the directions and there you go. Just try not to get a lobotomy after resetting it!

5. My CD or DVD is stuck in the optical drive and won’t come out when I press Eject.

After holding down the eject button for several seconds to no avail, restart your Mac and hold down the primary button on your mouse--the trackpad button will work as well if you’re on a MacBook--and during startup the disk should eject.

6. My Mac is not recognizing devices plugged in to one of my USB ports.

First, make sure your Mac’s firmware is up to date--check Software Update and the Apple Support Downloads page (support.apple.com/downloads/) and install any firmware updates you find for your machine.

If nothing happens, turn off your Mac, unplug the power cable, disconnect all peripherals, and let it sit for five minutes. Plug it back in, reconnect the keyboard and mouse, turn it back on, and try the USB ports again.


Check the Support Downloads page for firmware updates for your Mac.

If they’re still unresponsive, you will need to reset the PRAM (parameter RAM) and NVRAM (nonvolatile RAM), which stores some system and device settings that your Mac accesses on startup. Shut your Mac down. Then position your fingers above the Command, Option, P, and R keys on your keyboard. Turn the Mac on, then immediately press and hold those four keys before you see the gray screen. Keep them pressed until the Mac restarts again and you hear the startup chime for the second time. Then let ’em go. When your Mac is finished starting up, check those pesky USB ports.

If they’re still not behaving, there’s one more thing you can try before making a Genius Bar appointment: resetting the SMC, or system management controller. Directions for resetting the SMC on your MacBook Pro are found at support.apple.com/kb/HT1411. Instructions for all other Macs are linked from support.apple.com/kb/HT1894.

In Search Of...Search Solutions


Leopard makes finding files and data on your Mac relatively trouble-free, but when it comes to search, there are improvements and tricks you can apply to make it even better. Here are two solutions to common search problems we hear about from a fair number of Mac users.

7. My Spotlight results have stopped working reliably.

If it’s a single non-Apple program that isn’t showing up properly in your Spotlight results, try turning off and on the Spotlight indexing in that particular app.

If you’re still getting Spotlight results for an app that you got rid of a while ago, you may not have completely deleted all of the data or databases that are associated with that program.


Spotless gives you a nice GUI for managing, deleting, and rebuilding your Spotlight indexes.

If it’s an Apple program--or your entire Mac--that isn’t working properly in Spotlight, try re-indexing your whole hard drive by going into the Spotlight System Preference, clicking on the Privacy tab, then dragging your hard drive into the list. Wait a moment, and then remove your hard drive from the list again.

If you’re still having problems, you may need to bring out the big guns by using Spotless ($17, www.fixamac.net), a Spotlight index-management tool that can help fix most Spotlight problems.

8. I need more power, flexibility, and customizability with my Spotlight searches and Spotlight results.

Get HoudahSpot ($25, www.houdah.com), which lets you create extremely detailed search requests and customize the results to your liking.

HoudahSpot handles Spotlight searches with much more flexability than Apple's built-in Spotlight search.

3 Essential Utilities


Three more Mac problems solved--before they happen!

9. Disk Warrior


($100, www.alsoft.com) This is a great preventative maintenance tool for rebuilding your Mac's directory and keeping your mac running quickly and smoothly. It's also a great emergency tool for repairing disks that have missing files or will no longer mount.

10. Cocktail


($15, www.maintain.se/cocktail/index.php). This general all-purpose utility will clean the caches on your machine, run the UNIX maintenance scripts, unlock hidden features of your Mac, and much more.

11. SuperDuper


($28, www.shirt-pocket.com). This disk cloning utility is great for backing up or transferring all the data on your entire computer to a fully bootable state.


Email and Web Problems


We know you spend most of your time in front of a Mac online or pounding out email. Here's how to answer when trouble comes knocking.

12. I use a webmail client to check email, but every time I click on an email link, it launches Apple Mail instead.

You can set up Apple Mail to access your webmail account using IMAP or POP (check with your webmail provider for instructions on how to do this; some charge a fee for this service), or you can install the program Webmailer (free, www.belkadan.com/webmailer), which lets you set any webmail site as your default email program.


We set up Webmailer to take us to Yahoo's webmail system whenever we click on an email link.

If you use Gmail, you have a few additional choices: You can install Google Notifier (free, toolbar.google.com/gmail-helper) and set that to your default email client in Mail’s preferences. Or you can use the outstanding Mailplane ($25, www.mailplaneapp.com), which provides many more features than the Gmail website.

13. I can receive but not send email messages.


Outgoing email messages are typically sent over the Internet using TCP port numbers 25, 465, or 587. However, in an effort to reduce spam, some ISPs and firewalls are set up to severely restrict the use of those ports. For example, AT&T is notorious for blocking port 25 for its DSL customers, unless you’re sending email with the AT&T email address assigned to your DSL modem. If you’re using AT&T (or another service provider that has similar restrictions), call the technical support number and request that they unblock port 25 for you. If you don’t control the Internet access where you are located, contact your email host to see if they have an alternate port that you can send email on. You can specify alternate port numbers in your email app’s account settings. If all else fails, you should be able to send email through your webmail system until you can physically get yourself to a different location that has no restrictions.


Our Web-hosting company, hostbaby.com, allows us to send email messages over alternate port 2525, which typically bypasses any firewall restrictions that have been put in place.

14. When I reply to or forward an email, the original message isn't entirely quoted in my reply--sometimes just the header and a few characters are quoted.


If you used your mouse to highlight some text in the original email, and then you clicked on forward or reply, only the words that you selected will be quoted in your new email. To override this behavior in Mail (it can’t be overridden in Entourage), go into Mail’s Preferences, click on the Composing button, and you can set it to include all of the original message. If the problem still happens after this, your Mail preferences might be corrupt. Quit Mail, and trash the file located at yourhomefolder/Library/Preferences/com.apple.mail.plist. Also try upgrading to Snow Leopard, which makes Mail more reliable in general.


The Composing preference in Mail ensures that your replies and forwards will always quote the original email message in their entirety.

15. I want to send an email later, not now.


Each email client handles this slightly differently.

In Entourage, choose Message > Send Message Later or click on the Send Later button. (In Entourage 2008, you’ll need to add the Send Later button to your toolbar by choosing View > Customize Toolbar from any outgoing message.) Your messages will queue up in your outbox, and then you can send them all at once by creating an Entourage schedule (Tools > Schedules) or by clicking the Send & Receive button.

In Thunderbird, choose File > Send Later. Your messages will queue up in the Unsent folder until you choose File > Send Unsent Messages.


The Send Later Extension lets you schedule your outgoing messages in Thunderbird.

The Send Later Extension for Thunderbird (free, www.unsignedbyte.com/?page_id=4) lets you schedule an exact date and time in the future to send your message.

Surprisingly, Mail provides no ability to send messages later. You could take all your accounts offline (Mailbox > Take All Accounts Offline) before clicking on the Send button, in which case your messages disappear until you quit and relaunch Mail to find a temporary outbox with your messages sitting in them. Or, to schedule emails for a later delivery time that you specify, install the Schedule Delivery script which is a part of Mail Scripts (donations requested, homepage.mac.com/aamann/).

Finally, LetterMeLater (free, www.lettermelater.com) offers another way to schedule emails to be sent at a later time.

16. I have multiple folders entitled Drafts, Sent, Junk, or Trash for my IMAP email account.

Setting up an IMAP account can be a little tricky. After typing your valid account settings into your email program, there are two additional steps:

First, you’ll need to set the proper IMAP path prefix (sometimes called the “root folder” or IMAP server directory) in your account settings. For example, Gmail’s IMAP Path Prefix is [Gmail].


Defining your IMAP server's root folder is an often-forgotten step when setting up an IMAP email account.

In Entourage, you set this on the Options tab of your IMAP’s account settings. In Thunderbird, click the Advanced button on the Server Settings tab. In Mail, this is on the Advanced tab of your IMAP’s account settings.

Then you’ll need to designate which folders on the server should be used for storing your drafts, sent messages, trash, and junk. In Entourage, you set this on the Advanced tab of your IMAP’s account settings. In Thunderbird, this is done in the Copies & Folders section of your account settings. In Mail, go out to your main viewer window and select a folder on the server (in the left-hand margin, underneath the IMAP account name), then choose Mailbox > Use This Mailbox For.

17. Whenever I address an outgoing email, I get unwanted email addresses for people who aren't in my address book.

Most email clients keep track of addresses that you’ve emailed to in the past and will suggest those addresses to you in the future when you start to type the same characters. You can turn off this feature in Entourage and Thunderbird by going into their preferences. In Entourage, this is found on the Compose tab. In Thunderbird, this is on the Composition > Addressing tab. You can’t turn off this feature in Mail, but you can clear the list from time-to-time by selecting Window > Previous Recipients, selecting the names and clicking Remove from List.


In Mail, you have complete control over your Previous Recipients list.

18. When I email long Web links to others, they sometimes get broken up onto multiple lines and don't work correctly.


Try putting angle brackets (<>) around long URLs to help them travel safely across the Internet without “breaking.” Or you turn to TinyURL (free, www.tinyurl.com), which will turn those long URLs into, well, tiny URLs!

19. I wish Safari's built-in search field worked with more websites than just Google.

You may want to switch to Firefox, which has the built-in ability to customize its search field with any number of search engines that you specify. Otherwise, check out the Safari plug-ins Saft ($12, haoli.dnsalias.com) or Glims (free, machangout.com), both of which let you customize Safari’s Google search field. And one of our favorite utilities, iSeek ($15, www.ambrosiasw.com) lets you add a global customizable search field to your Mac’s menubar that works with any Web browser.


iSeek places a fully customizable search field in our menubar at all times.

20. I want to filter inappropriate websites so my kids can't access them.


Although Mac OS X has built-in parental controls that you can turn on for individual accounts, you can gain more control by purchasing software like ContentBarrier ($50, www.intego.com) or Net Nanny ($39.99 a year, www.netnanny.com). Even better, we’ve discovered that one of the quickest, easiest, and most effective ways of filtering all the computers in your entire household is to switch your DNS servers to the free OpenDNS servers (free, www.opendns.com).


ContentBarrier is one of many options you have for blocking websites on your Mac.

21. My Internet connection is slow.


That’s a tricky one. A sluggish Net connection could be caused by any number of things, so here are a few troubleshooting tips to start with:

Try resetting Safari (Safari > Reset Safari). Then, try a different Web browser to see if the problem happens there as well. You may also want to uninstall any Internet plug-ins that you have installed recently.

Next, check your upload and download speeds at www.speakeasy.net/speedtest and see if you’re getting the speeds you’re paying for. If not, try power cycling both your modem and router, such as your Airport Extreme. Turn off or unplug the device, let it sit powered off for several minutes, then plug it in or switch it on again.


Our latest speed test from Speakeasy.net shows us that we're not currently getting the full upload speeds for which we've been paying the big bucks!

If these methods don’t address the slowdown, try plugging your modem directly into your Mac using an Ethernet cable to see if the problem goes away. If so, your router may be the problem. If you’re using an Airport Extreme or Airport Express, launch Airport Utility to see if there is a firmware upgrade available. If so, install the firmware upgrade and see if that helps.

If not, your Mac could be the problem--you may need to perform an Archive and Install of your operating system, which is one of your options on the Mac OS X Leopard Installation DVD.

And it’s always possible that your modem or Internet line is the problem too, in which case you should call your ISP’s technical support number.


Photo Problems


These solutions to common photo issues will make you want to say "cheese."

22. I need to quickly resize an image and make some color corrections to it, but I can't afford Photoshop and don't really want to learn how to use it.


Preview has the built-in ability to resize images and adjust colors. Open up your image in Preview and select Tools > Adjust Size or Adjust Color.


This image-size adjustment dialog box is from Preview, not Photoshop!

23. I want to email photos from iPhoto through my webmail account by clicking on iPhoto's Email button.


Even if you’ve installed Webmailer, as mentioned in problem #12, the email button in iPhoto will only work with four email clients: AOL, Eudora, Entourage, and Mail.

However, if you use Gmail, you’re in luck because Mailplane ($25, www.mailplaneapp.com) installs an iPhoto plug-in that lets you click on iPhoto’s Email button and send your messages through your Gmail account.


In any dialog box, you can activate QuickLook when browsing your iPhoto Library by selecting a photo and pressing the spacebar.

Otherwise, go into your webmail program, and attach photos using the standard method. Leopard’s dialog boxes give you the ability to browse through your iPhoto library, and they even let you use QuickLook by clicking on a photo and pressing the spacebar.

24. I want to use iPhoto '09 to export photos to Facebook, but there are too many problems with it.


Forget about using iPhoto ’09’s poorly implemented Facebook “integration.” Instead, use the outstanding Facebook Exporter for iPhoto (free, developers.facebook.com/iphoto).


Use Facebook Exporter for iPhoto to tag, add captions to, and upload your Facebook photos right from within iPhoto.

25. I created a PDF file with lots of embedded photos in it, but now the file is way too large to email.


Open up the large PDF file in Preview and select File > Save As. Where it says Quartz Filter, choose Reduce File Size, then click Save. VoilĂ ! You’ve now saved a much smaller version of your PDF file, which will be easier to email.


Choose this Quartz Filter in Preview to reduce the size (and quality) of large PDF files so you can email them without choking your email server.

For even more control over the resulting quality of PDF size reduction--and to batch-process multiple PDF files at once--try PDFshrink ($35, www.apago.com).

If you still can’t get the file small enough for your needs, try a file-sending service such as YouSendIt (www.yousendit.com).

26. Somebody emailed me a PDF file with lots of embedded photos in it, and I need to extract the photos from the file.


File Juicer ($18, www.echoone.com) will extract images, sounds, and more from any filetype.

File Juicer can extract all these types of files out of other files.

Office/iWork Problems


Work smarter not harder with these troubleshooting tips for common productivity apps.

27. I created an awesome slide show in Keynote, but I have to present it on a PC. I tried exporting it to Microsoft PowerPoint format, but I lost my transitions, effects, transparencies, gradients, and more--basically, all the cool stuff.


Export your Keynote file to a QuickTime movie instead. As long as the PC has QuickTime installed on it (which it should, if it has iTunes installed), you’ll be able to play back your presentation with all of its awesomeness intact. If the PC doesn’t have QuickTime, download it for free from www.apple.com/quicktime.


With the "Fixed Timing" option, we can set our QuickTime movie to automatically advance to the next slide on a regular interval.

When you export your movie, you have several options for how it should advance from one slide to the next. For example, if you set it to manually advance, you simply have to press the spacebar on the PC to move to the next slide.

28. I’ve included presenter notes (View > Show Presenter Notes) in a Keynote slide show, but when I play or rehearse the slide show, the notes don’t show up onscreen.


In Keynote’s preferences, click on the Presenter Display button, and check the boxes for Notes and “Use alternate display to view presenter information.” Now your notes will show up when you play or rehearse your slide show.


This checkbox lets you toggle between mirrored displays and dual displays.

However, if you start seeing your notes on both your computer screen and the projector’s screen, your computer is set to mirrored (instead of dual) displays. You can toggle these display modes while the projector is connected to your Mac by launching System Preferences, choosing Display > Arrangement, and deselecting the Mirror Displays checkbox.

29. I use Office 2008 to create Word, Excel, or PowerPoint files, but my Mac-using colleagues can’t open the files because they’re using Office 2004.


TextEdit can open and edit Word 2008 files. And if your colleagues have iWork ’09 installed, they can work with all of your Office 2008 files in Pages, Numbers, or Keynote.

Otherwise, you’ll need to save the file in an earlier file format. Choose File > Save As and select the format that corresponds to Office 97–2004. You can also set this older format as the default in your preferences for Word, Excel, and PowerPoint.


Choose the .doc format to avoid compatibility issues with people using earlier versions of Microsoft Word.

Alternatively, your colleagues can install Microsoft’s Open XML File Format Converter (free, www.microsoft.com/mac/downloads), which will convert your Office 2008 files into a format that Office 2004 can read.


Syncing Problems


Data syncing can be particularly stressful since we need access to info anywhere these days. We've got solutions.

30. I want to sync some--but not all--of my iCal calendars across my Macs.


Don’t use MobileMe to sync, which always synchronizes all of your calendars. Instead, use BusySync ($25, www.busymac.com) or BusyCal ($40, www.busymac.com), which both give you an incredible amount of syncing options.


BusyMac's products are true champions when it comes to publishing and subscribing selected calendars without any dedicated servers.

31. I want to synchronize my iCal calendars and Address Book on my Mac to Outlook on a PC.


Sign up for MobileMe ($99 a year, www.apple.com), which will keep all of your Macs and PCs (and iPhones!) in sync with each other.


Spanning Sync effortlessly syncs your calendars and contacts to Google.

Or, you can use Google Calendar and Google Contacts as a conduit. On the Mac side, you’ll need Spanning Sync ($25/year or $65/one-time purchase, spanningsync.com). On the PC side, you’ll need Google Apps Sync ($50/year, tools.google.com/dlpage/gappssync).

32. I keep getting duplicate entries on my iCal calendar.


Sounds like you’re trying to sync your Entourage calendar with iCal. There’s a known bug with Entourage that causes repeating events to multiply out of control in iCal. We don’t know of any long-term solution at this time except to ditch Entourage’s calendar and stick to iCal for your calendaring needs. To do this, uncheck the box for syncing events in Entourage’s Preferences (on the Sync Services pane). To erase iCal dupes, try iCal Cleaner (free, www.busymac.com).

33. I’m getting two of each calendar entry on my iPhone.


You may be trying to sync your calendars through both iTunes and MobileMe. You’ll need to choose one method or the other, not both. If you’re syncing wirelessly through MobileMe, then go into your iPhone settings within iTunes and uncheck all of your calendars there.

The exception to this rule is iCal’s Birthdays calendar (enabled in iCal’s preferences, this calendar pulls birthdays from your Address Book), which can only be synced through iTunes, so it must remain checked in iTunes.

34. My U.S. Holidays and other Internet-subscribed iCal calendars are not syncing between my Mac and my iPhone.


Any Internet-subscribed calendars must be resubscribed to directly from your iPhone. You can manually set up the server on your iPhone by going to Settings > Mail, Contacts, Calendars > Add Account > Other > Calendars.


You must resubscribe to your iCal holiday calendars on your iPhone all over again.

Or, you can automatically subscribe to a calendar by using Safari on your iPhone to choose from Apple’s extensive selection of calendars at www.apple.com/downloads/macosx/calendars.

35. iTunes no longer launches automatically when I attach my iPod or iPhone to my computer.


If your iPhone or iPod is very low on power or if the battery is fully depleted, it can take up to 10 minutes to appear under Devices in iTunes.

Otherwise, you may have unchecked the box in iTunes for your device that says “Automatically sync when this iPhone/iPod is connected” or “Open iTunes when this iPod is attached.”

You may have also removed the iTunesHelper application from your Login Items in your Account System Preferences, which is required to automatically launch iTunes. You can get this back by reinstalling iTunes (www.apple.com/itunes) or by manually dragging iTunesHelper into the Login Items. iTunesHelper can be found by right-clicking on iTunes in the Finder and choosing Show Package Contents, then going to Contents > Resources.

36. I want to synchronize files between two computers.


There are many different programs available to help you with this task, but our favorite is ChronoSync ($40, www.econtechnologies.com). ChronoSync can automatically mount remote servers, wake your local Mac from sleep, schedule your synchronizations, archive backup copies of your files before syncing, and even give you a list of proposed changes before it makes any of them.


Synchronizing files between two different computers is as simple as drag-and-drop with ChronoSync.

While you can use ChronoSync to synchronize to any type of volume or folder, if you specifically want to sync to another computer, you may want to additionally purchase ChronoAgent for an extra $10. ChronoAgent lets you communicate directly with a remote Mac faster than using AFP or SMB, and you gain full root access, so you can copy anything without any restrictions.

37. I turned on MobileMe syncing on my iPhone, but nothing is syncing to my Mac or Me.com.


It’s possible that the MobileMe servers aren’t communicating properly with your iPhone. An Apple support rep recently admitted to us that this is an extremely common problem that MobileMe users may experience every few months until Apple increases the reliability of its MobileMe syncing servers. So you may want to keep these instructions handy for future reference.

First, find out if MobileMe sees your iPhone at all. Activate Find My iPhone on your iPhone (Settings > Mail, Contacts, Calendars > your me.com account > Find My iPhone). Then, from a computer (not your iPhone), go to your MobileMe account page at https://secure.me.com/yourusername. Click on Find My iPhone to see if the MobileMe website sees your phone. If not, try turning off your iPhone and turning it back on again. If the MobileMe site still doesn’t see your phone, try deleting your MobileMe account on your iPhone and re-creating it again.


We feel like Big Brother is watching us with Find My iPhone's crosshairs centered directly on our house!

Once Me.com sees your iPhone, try adding an event or a contact to your phone and see if the change shows up on your MobileMe calendar (www.me.com/calendar) or address book (www.me.com/contacts) within a few minutes.

If not, you will probably have to reset all of your sync data on Me.com with information from your Mac’s iCal and Address Book. Make a mental note of any recent unsynced changes you’ve made on your iPhone, because you’re going to lose them in this process. Also, sign out of Me.com. Go into the MobileMe System Preference on your Mac, select the Sync tab, click on Advanced, and then click Reset Sync Data. Click on the right arrow so that you are replacing all sync info on MobileMe with “info from this computer.”

Log back into Me.com and verify that it now has your current information for contacts and calendars. If not, you will have to reset the SyncServices database on your Mac. Apple has instructions on this process at support.apple.com/kb/TS1627.

But before following those instructions, be sure to do two things on your Mac: First, repair your permissions using Disk Utility (Applications/Utilities), and, second, repair your keychain using Keychain Access (in Disk Utility, pull down from the Keychain Access menu and select Keychain First Aid). After that, try syncing again from the MobileMe System Preference pane.


This is how it should look when you're about to overwrite information on the MobileMe website with information from your Mac.

Once Me.com has your current information, you are ready to go back to your iPhone. On your iPhone, go to Settings > Mail, Contacts, Calendars > Fetch New Data. Turn Push off, then completely turn off your phone for 30 seconds. Turn your phone back on and re-enable push. Then, go to Settings > Mail, Contacts, Calendars > your Me.com account and turn off and on each one of the sliders for the information that you’re trying to sync (Contacts, Calendars, Bookmarks, etc).

Wait several minutes, and hopefully all your current information will reappear in your calendar and contacts on your iPhone.

If not, you will probably need to have a live chat with a MobileMe support agent. Go to www.apple.com/support/mobileme. Choose any of the troubleshooting options underneath Syncing with MobileMe in the left-hand margin, and a Chat Now button will appear.