A disassembler is a program that lets you look at a program's machine
code while executing on a computer. Disassembly is a type of analytic
procedure programmers use to view how a program runs in memory. Several
programs let you disassemble a setup.exe file. Disassembling a setup.exe
file allows you to see how the installation procedure runs on the
computer.
Instructions
Download and install the IDA Pro program by Hex Ray (see
Resources). The program is a color-coded application that lets you
discern between your setup.exe code and the Windows operating system
code. The memory view shows you the executing code for the EXE file
located in memory. The program also let you manipulate values and pause
the execution of the file. This helps you test program options for your
setup.exe file.
Download and install W32 DASM on your computer that has the
setup.exe file on it (see Resources). W32 DASM is a free program, so it
is good for people who are new to disassembling execution files and
reading the code in memory. The interface is a single window that
displays the code in each memory address. You cannot change the code in
memory like you can with IDA Pro.
Download and install OllyDbg (see Resources). The OllyDbg
program is a disassembler and a debugger. A debugger works with a
disassembler to view the code in memory and lets you manipulate the code
to find problems and errors in the setup.exe file. The OllyDbg program
is open source, so you can also add open source modules or add your own
add-on to the program.
This page is meant to provide some basic suggestions and strategies
for people who are starting out with reverse engineering old adventure
games, and aren't sure how to do it. It mainly focuses on resources and
tools for reversing DOS game executables, but much of the strategies
discussed may apply equally to other systems and debugging tools. This
is only intended as an overview; you'll still need to read other
resources to learn 8086 assembly language, and learn how to use the
various tools effectively.
Resources
IDA Disassembler
IDA is one of the best disassemblers available. And luckily, the
freeware version works with old DOS executables. Even more so, the
current freeware version supports viewing disassemblies in graph mode,
making it easier to see the overall flow of individual methods.
DosBox Debugger
The DosBox Debugger is an invaluable tool for running old DOS games, to
monitor how the program executes, and what values are generated by the
executing code.
XVI32 Hex File Viewer
Although IDA has a built in hex viewer for the executable itself, the
XVI32 tool is useful for viewing the contents of all the other files
that come with a game. There are many different freeware hex editors
available, so any other can be used just as easily.
Ralf Brown's Interrupt List
A nice reference for the operation of DOS interrupts. In 8086 assembly,
apart from directly accessing ports, using interrupts is the primary
means of accessing system functionality such as opening files, changing
graphics modes, and many other things.
8086 Assembly Language
For those new to 8086 assembly language, you'll need a handy reference
to learn the syntax. The Wikipedia is a good starting point, but you can
also simply Google for an introduction as well.
Using the DosBox Debugger
It's up to the individual if you want to use a debugger when reverse
engineering a program. Some prefer a more cerebral challenge of only
figuring out code execution using a decompiler tool, whereas others may
find using a debugger useful for figuring out what values are passed to
functions. I would recommend using a debugger particularly when
reversing a game for the purpose of adding ScummVM support. When you
start implementing code to implement game functionality, once you've got
portions of the game disassembled, it can be immensely useful for
tracking down bugs. Particularly if you initially write your code with
names that closely match the names you give the methods in the
disassembly.
For debugging purposes, if the game is a DOS game, the DosBox
Debugger is the best tool I've found for executing and debugging DOS
programs. The default distribution of DosBox doesn't have it enabled,
but you can either compile DosBox with it enabled, or download a
previously compiled executable. See the DosBox Debugger Thread for more information.
One of the biggest initial steps when using the DosBox debugger
is matching addresses in executable at run-time with your disassembly in
IDA. This can be done either from the debugger to IDA, or from IDA to
the debugger:
From the debugger to IDA
This is the easiest. If you break execution of the game at any point,
you can simply use the Find Binary option in IDA to search for a
sequence of bytes from the instructions shown in the DosBox Debugger
disassembly area. Be careful to pick instructions that aren't far calls
or jumps - such instructions are modified when a program loads depending
where it loads in memory, so the IDA disassembly won't have the exact
same bytes. If you do find a match, double check that the offset within
the segment of the found match in IDA matches the offset of the
instructions in the DosBox Debugger. If not, you may have found a false
match, and should either search for the next occurrence, or specify
extra bytes in your search until you find the correct match.
From IDA to the Debugger
If you have a point in the IDA disassembly and want to figure out
what address it will be loaded in the DosBox Debugger, it's also not
hard. This is presuming the game in question doesn't use Overlays.
Overlays were a method developed when games and other applications
became too big to fit into memory at once. In these cases, code for the
program is often stored at the end of the executable, or in separate
files, and loaded as needed into part of the memory, overwriting
previously loaded code. In such situations, it becomes hard to pin down a
specific section in memory a given segment will be loaded at, since it
may shift around in memory over the course of the program running, as it
gets loaded, overwritten, and loaded again repeatedly.
So long as the game doesn't use overlays, the following steps can be used:
- look at the IDA view to find out the current file offset at the
bottom of the screen. You'll quickly find it if you try selecting
different instructions, since it will keep changing. Now:
- Get the value from the beginning of the current code segment.
This is just to make the calculations easier, since the start of the
segment will have an instruction offset between 0h and 0Fh, which means
it won't be messing with
our segment calculations
- Get the value from the beginning of the entire disassembly.
- Drop the last digit from both values, and get the difference between the two.
- For executables run in DosBox, add a value of '0138h'. For COM files, add a value of '0128h'.
This will give you the segment address of where the segment
should be under DosBox. In either case, it's generally a good idea is to
then rename the current segment in the IDA disassembly so that it
includes the actual segment address of where it was loaded in DosBox.
For example, the first segment of executables is normally loaded
at segment 0138h in memory, so you might rename the segment 'sg0138'.
That way, if you later want to set a breakpoint in the DosBox Debugger
for any instruction in the segment, you will immediately know what the
segment is.
Using IDA Effectively
One of the best things to do when disassembling a game is to document everything. Particularly method parameters and structures.
Naming Methods
Methods can be renamed using the general 'N' hotkey (as well as via
the menus), and the 'Y' can be used to specify a C-like prototype for a
method. This is particularly useful when some of the parameters for a
method are passed using registers. By explicitly documenting what the
method expects, it makes it easier to remember later on when you're
reversing methods that call it. Standard methods where parameters are
passed via the stack are easy, since IDA can automatically set up the
function prototype for you. If a method does have parameters passed in
registers, prototypes like the below can be used:
int __usercall sub_100FB<ax>(__int8 param1<al>,int param2<bx>)
In this case, the method takes an 8-bit parameter in the al register,
and another 16-bit value in bx, then returns a result in ax
Using Structures
The other thing you'll need to learn to use IDA effectively is the
use of structures. Irrespective of what language a game was originally
written in, there will always be structures containing related
information. It may be something as simple as a C-style struct, or could
even be the fields of a class in C++.
When dealing with data, you'll frequently see cases like
movbx, 30h
mulbxmovax,[bx+2D00h]
In this case, an initial index in the ax register is multiplied by
30h (30 hexadecimal = 48 decimal). So from this we can determine that
the given structure is 48 bytes in size, and can create a new structure
accordingly. For smaller sized structures, you may want to create as
many 2 byte word fields as needed to make up the correct size for the
structure. For larger sizes, the easiest way is to simply declare an
array of the needed structure size - 1, and follow it with a single byte
field. You can then delete/undefine the array. The remaining byte will
keep the structure at the correct size, and you can then later fill in
the fields as you find references to them.
Secondarily, the value of '2D00h' indicates an offset in the data
segment, representing the rough starting address of the first element
of the given array in memory. Here we run into a minor problem. The
offset of '2D00h' may not indicate the precise start of the array. If
the code in question wanted to get the value at offset 8 in the
structure, then the array may actually start 8 bytes earlier in memory,
at address '2CF8h'.
In such cases, the only way to tell for sure is to start
searching for immediate values in the program of values bytes backwards
at a time, until you can't find any more values. For example, if you
find references in the code of values '2CFFh', and '2CFEh', each with
previous multiplications by 30h/48, but none for '2CFDh', '2CFDCh', or
'2CFBh', then you can probably be confident that the array starts at
offset 2CFDh.
Once that's determined, you can then create a dummy structure of
the correct size, and convert the given address of 2CFDh to an instance
of that structure type. Until you're more familiar with the range of
values the original array index may be, it'll likely be easier to simply
leave the defined array with the single index. Later on, you can always
change the structure in memory to specify how many elements it has
later on.
Remember that fields in structures can vary in size, so it's
always possible you'll get the starting address wrong. In which case,
you may have to later on correct the address of the structure in the
data segment. This will affect any fields you figure out as well. In the
above example, if you mistakenly presumed the array started at offset
2CFDh, then 2D00h would be thought to be a field at offset 3 in the
structure (2CFDh + 3 = 2D00h, as per the above example code fragment).
However, if the array structure really starts at 2CF8h, then the same
field should be at offset 8 within the structure (2CF8h + 8 = 2D00h). So
you need to rebuild the list of fields you'd figured out in the
structure, since they'll all be at the wrong position. Overall, it's
better when encountering an array to spend the extra time to ensure
where it starts in memory so you don't need to fix offset problems later
on.
Disassembly Strategies
One of the hardest things when starting work on a new disassembly is
to figure out how to begin. The following are offered as suggestions of
how to get started in the disassembly process.
File Access
One of the easiest places to start a disassembly is generally by
identifying file accesses. Using IDA, you can, for example, do a text
search for 'open', 'read', 'close', etc. to find occurrences of file
opening. IDA provides standard comments for many operating system calls,
so even in a new disassembly you should be able to locate such calls by
their comment text. Likewise for file reading, writing, and closing.
Normally, a program will encapsulate these calls into a method of it's
own, so your first disassembly step can be in identifying the methods
and naming them appropriately with names like 'File_open', 'File_read',
and so on. Likewise, giving the passed parameters an appropriate name.
In IDA, the 'Y' command can be used to set up an appropriate method
signature for methods. By properly naming the method and it's
parameters, this will help you in all the methods that call those
methods.
For example, if a read method has a 'size' parameter and a
'buffer' parameter, then if a method that calls it passes '200' for the
size, and a reference from a location on the stack, you can be confident
that the stack entry can be called something like 'readBuffer', and use
the '*' (array size) key when looking at the Stack View (Ctrl-K) to set
the size of the array to 200 bytes.
You should hopefully then be able to start working on methods
that call the file access functions and hopefully start decoding them.
Some examples:
1. If the game consists of only a few large data files, the
methods that call the open/read/close functions may a resource manager
responsible for loading subsets of the file. In which case, the methods
may likely load some kind of index into memory and then have a separate
'get resource' method that scans through the list for a resource with a
given Id, resulting in a specific portion of the data file being read.
In this case, you can identify all the methods with appropriate names
like 'ResourceManager_init', 'ResourceManager_loadIndex',
'ResourceManager_getResource', and so on.
The DosBox debugger may prove useful when dealing with games
using large resources. In DOS, Interrupt 21h is one of the primary
system interrupts. Specific command Ids are passed in AH, and the other
registers are set with values depending on which function is being
called. For example, command 42h of Interrupt 21h is the command for
seeking within a file.
Try using 'BPINT 21 42' to put a breakpoint on any calls to seek system
function. By clearly identifying the 'Seek method', you can then step
out of that routine to find what called it. Hopefully, you can then
examine the logic in the disassembly used to generate the file offset to
help you figure out how file offsets are generated for specific
resources, and from that figure out how the resource's index works.
Remember that game resource managers not only typically merge
multiple individual resources into one single bigger file, they
frequently also compress them as well, to save space and prevent people
from seeing textual resources when viewing the contents of the file. In
such cases, if you can figure out the strategy used for extracting
single resources, it may be worthwhile taking the time to code a
standalone program to extract and, if necessary, decompress single
resources into separate output files. That way, you can more easily look
at individual resources that are used by the game without having to
worry about manually locating them in the archive/resource file.
2. If the game consists of many different files, it's likely the
game will be manually calling the open/read/close methods whenever it
wants to access a particular file/resource.
In either case, figuring out the file access routines will give
you an excellent start into figuring out the contents of the game; you
can then move onto methods that call the resource manager get resource
method, and start looking at what kind of resources are loaded, and from
there start identifying methods that make use of those resources.
Graphics access
Another place to get started on the disassembly is the graphic draw
routines, those responsible for copying raw pixels to the screen
surface.
Graphic display was complicated in the early PC days by different
modes for the different graphics cards writing to memory in different
ways. In the Monochrome/Hercules mode, for example, 8 pixels are stored
per 8-bit byte. In EGA, the addressing can be complicated by how the
display is configured - the same areas of memory may be used to
represent different parts of pixels - with the part of a pixel being
updated depending on specific values sent to hardware ports. Finally, of
them all, the most common 320x200x256 colour mode is the easiest to
deal with, with each pixel taking up a single byte.
For most of the graphics modes, you can look at them in a similar
manner - as a block of data in memory starting at offset A000h:0. Only
the number of bytes per line will vary, depending on what the graphics
mode is. Assembly routines that deal with the graphics screen will
typically have code to figure out screen offsets based on provided x and
y parameters, so it will frequently be easy to identify the parameters
and figure out how the screen offsets work. For example, in 320x200x256
MCGA mode, an offset on the screen will be calculated using the formula
(y * 320) + x.
For finding the graphic routines you have two options:
The first is to entirely use IDA, and simply search for immediate
values of 'A000h'. Since this is the area of memory that graphics are
commonly displayed in, it can be a quick way to locate graphic routines.
The other alternative is to use the DosBox Debugger. It has a use
command called 'bpm' that allow you to set a memory breakpoint, which
then gets triggered if the given memory address changes. So you could do
'bpm A000:0' to set a breakpoint on the first byte of the screen memory
(i.e. the top left hand corner of the screen). Then whichever routine
modifies it first will trigger the breakpoint. Using the previously
discussed techniques, you can find the same place in your IDA
disassembly, and look into reversing that method first.
It will be likely that related functions will be next to each
other, so once you've looked into the given identified function, you may
also be able to review previous or following functions to see if they
have identifiable graphic routines.
Data Segment strings
The strings in the data segment can be an excellent source for
identifying the purposes of various methods. If you're very lucky, there
may be error messages that contain the name of the function as part of
the error. In which case, you can then find out what code references it,
and name the methods appropriately.
Note: IDA is good, but it's not perfect., It's not always
guaranteed to be able to figure out that a given value loaded into a
register somewhere in the program is for a reference into the data
segment. As such, if the cross-reference command doesn't give any
references for a given string, try searching for an immediate value of
the offset of the string. Chances are, any reference you find is likely
pointing to the string. You can then use the 'O' command to change the
operand from an immediate value to instead point to the offset in the
data segment.
Even if any error messages don't contain method names, an error
message can prove invaluable. For example, an error message like "Unable
to initialise mouse" tells you that whatever method uses it is setting
up the mouse for access, so could be given a name like
'initialise_mouse', or 'initialise_events'.
Likewise, have a look at the context of what needs to happen for
the error message to be printed, since the message can give you insights
into what is being done. A message like "No more free inventory slots"
tells you that the code that references this error message is likely a
routine for adding an item to the inventory (hence the error if no more
slots are available). From there you might be able to identify the area
of memory containing the inventory list, and then cross reference other
methods that also access it - you could end up identifying a whole
group of methods related to inventory manipulation.
Another possibility for data segment strings is to pick strings
that may be descriptive enough to guess their purpose. For example, if a
string has a name like 'FNT20', or 'UI.FNT', it's likely that it's a
font file, containing the images for each character for use in
displaying on the screen. In that case, any code that references it is
likely to be passing it to a 'font_open' function, which loads up the
font. If you can disassemble that method, you may be able to determine
how the loaded font is stored in memory. From there, you can use the
cross references function of IDA to find other methods that use the same
memory address as where the font is stored, and which will likely give
you the methods for actually displaying text on the screen.
From there, you may be able to go even further, and start
figuring out methods that call the 'write string' function.. menus,
hotspots, conversation handlers, and so forth.
Program execution
Another method for identifying methods may be simply executing the
program itself. When running the program in DosBox, you may find it
useful to start stepping through the main procedure to see what happens
from stepping over every method. IDA may be helpful in identifying the
main procedure, but even if not, most programming languages have a
series of method calls for setting up the initial application state,and
then a single final call to the 'main' method.
With the main method identified, stepping over each method may
produce interesting results. For example, stepping over a single method
call may run all the code for showing the game's introduction sequence
before returning control to the debugger. If this can be identified, you
could name the method appropriately. You may then be able to gleam
information from how the method is called and for the method itself:
For where the method is called, there may be conditional checks
to see whether the method is called or not. For example, some games may
have a stored settings file to flag whether the introduction has been
shown, and not show it again after the first time the game is played..
In that case, a method call just prior to the method call to show
the introduction may be for reading in the game settings and checking
the flag for whether the introduction has been shown. Knowing this, you
could name multiple methods for reading settings, then within it file
opening and reading, and so on.
Within the method itself, you may likewise be able to figure out
further specific details of how the method is implemented from the
method calls it makes. For example, a 'play introduction' method may
consist of calling the same method multiple times with different
parameter values. These values may well be offsets within the data
segment for resource or file names for specific animations to run. In
which case, you now know the sub-method is an animation player, and name
it accordingly. You could then start work on the animation player,
figuring out how it loads it in data, and what method it uses to build
up and display graphics on the screen.
Particularly for cases like that, identifying and naming the
graphic/screen methods may be helpful, since you could work the
disassembly from both the front end reading the animation, and from the
low level drawing of the graphics of the animation.
Final Words
Reverse engineering a game can be a rewarding experience, but plan to
spend a lot of time working on it. Reverse engineering a game can take
months, even years for really complicated games. As you gradually start
figuring out sections of the original game, it may prove helpful to dive
into creating the engine in a fork of the ScummVM code. Re-implementing
things such as resource managers, and file access, it may help you
figure out the purpose of other methods more easily if you can see what
the code you implement does, and thus get a better idea of what kind of
data will be passed to other methods you haven't yet figured out.
"I forgot my windows 8 password on my computer. Can anyone give me some tips to help me recover the lost password?"
When you forget your windows 8 login password, you can use Windows 8 password recovery tool
to recover it. If you have ever enabled the hidden administrator
account on your computer, there is a best way for you to recover the
lost password.
First you need to prepare a password recovery disk burned from a Windows password Recovery program. Pakeysoft Windows Password Recovery
can be a good option, which can help you access your computer and let
you remove the password. Not only for Windows 8, this program also works
well on Windows 7, Vista, XP, 2008, 2003 and 2000.
Download Pakeysoft Windows Password Recovery from here
Step 1. Burn a bootable Windows 8 password recovery disk
After installing the program on your computer, run it. And you'll get the interface as follow.
Then insert a blank CD/DVD or USB flash drive to your computer, and
then select your target devices. Click 'Burn to CD/DVD' button or 'Burn
to USB' button to start burning.
Step 2. Boot your computer with the Windows 8 recovery disk
To set the computer to boot from CD/DVD-ROM, please refer to How to set computer to boot from CD/DVD-ROM.
To set the computer to boot from USB drive, please refer to How to set computer to boot from USB drive.
Step 3. Recover Windows 8 password
After booting the windows 8 password recovery disk correctly, you are
able to recover Windows 8 Administrator Password and other acount
password for Windows 8 system.
Select the user name of your target account, and then click "Reset".
Now take out of the disk and restart the computer. Then you can access your computer without being asked for any password.
As You can see, all the process is very easy and quickly! you can free download the trial version of Pakeysoft Windows Password to try to recover lost Windows 8 password.
How To Hack Windows 8 Admin Password or Login Password, Previously I already make a post about How To Hack Windows 7 Admin Password Now I am telling you how to hack Windows 8 admin or login password ,the process is quite same. This method is great if you forgot your Windows 8 admin or user password as you can easily change with new one. Don't need to be panic that you forget password.
Its
also good if you want to do some spy on your friend's PC as you hack or
crack your friend's Windows 8 PC and change the old password and set a
new one, so when he/she will access his/her Windows 8 computer will see
that wrong password. Whether you are using Windows 8 developer preview ,consumer preview , release preview or RTM version its work fine. So how to reset or crack Windows 8 password , lets follow me
Step 1. Get a Linux Live Cd
Step 2. Boot the cd
Step 3. Go to C:\Windows\System32
Step 4. Rename "Utilman.exe" file to "Utilman1.exe"
Step 5. Now rename "cmd.exe" file to "Utilman.exe"
Step 6. Restart your PC and remove the cd
Step 7. Now you will a screen like this that is normal
Step 8. Now click on "Ease of access"(left bottom corner of the screen) and cmd.exe will pop up like this
Step 9. Type "net user",without quotes in command prompt it will show all users list
Step 10. Now you have to add a new user so type
net user /add cyberkeyck
here your new username is "cyberkey" and its password is "ck"
Step 11. Now you have to make this user as a administrator ,so type
net localgroup administratorscyberkey /add
Step 12.Restart your pc, and login with your new user here its "cyberkey" , give the password "ck".
Step 13.Now its done ,now you may delete your old user account or change its password from control panel
Step 11.But that's not end, your PC is to totally correct , to make it correct again boot with your Linux cd
and go to C:\Windows\System32 folder , now rename "Utilman.exe" to
"cmd.exe" and now rename "Utilman1.exe" to "Utilman.exe". That's End.If you like it the share it.
Have you ever forgotten Windows 8 password? Did you take much time in looking for information online about how to reset Windows 8 password? However, the information should be few but useful. The following article is the one. Read it carefully and learn how to use Anmosoft Windows Password Reset to recover Windows 8 password easily and instantly. Let's look at the simple steps:
Step 1 Create a Windows 8 password reset disk with CD/DVD or USB drive Step 2 Reset the forgotten Windows 8 password
Step 1 Create a Windows 8 admin password reset disk with CD/DVD or USB drive
1. Download
and install Anmosoft Windows Password Reset on a workable computer.
Insert a blank CD/DVD or USB drive into the computer and run the
installed program. Note: Backup your important data and files if the CD/DVD or USB drive is not blank.
2. On the start page, choosing the device which you have inserted to burn a Windows 8 password reset disk. Then click Start.
3. Click Yes to confirm burning a Windows 8 password reset disk.
4. Click Close after the disk is burned successfully.
Step 2 Reset the forgotten Windows 8 password
Insert the burned CD/DVD or USB drive into the locked computer
and restart. It should be noticed that your locked computer should boot
from the disk. If the computer cannot boot from it, please set BIOS to boot from CD/DVD or USB flash drive.
1. Select the target Windows system, then click Next.
2. Choose the user accounts you want to reset password for, click Next to advance the Windows 8 password recovery process.
3. After interface reminds you password is reset successfully, take out the disk, and click Reboot to restart the computer. You can log in the Windows system without passwords.
Anmosoft Windows Password Reset—excellent Windows password recovery tool!
Only two steps is needed to reset Windows 8 password by using Anmosoft
Windows Password Reset. Besides, the software is also adopted to recover
passwords on Windows 7/Vista/XP/Server2008/ Server 2003/ Server 2000
etc.
Four different versions of Anmosoft Windows Password Reset all
work well in Windows password recovery for all brands of Laptops
(notebooks), Desktops, such as HP (Pavilion), Dell (Inspiron), Lenovo,
ThinkPad, Acer, Asus, Compaq, Toshiba (Satellite), Benq, Sony, Samsung,
Fujitsu, Hitachi, NEC, Gateway etc. >> Edition compare
Such a multifunctional and powerful Windows password recovery tool definitely deserves your attention and use when you forgot Windows 8 password.
Corrupt system files, account lockouts, and accidentally deleted data
are three scary computer problems that often send people running for
their backup drives. While restoring a backup may technically fix
things, a full system backup is usually a very time-consuming overkill
in these cases, and nobody likes the time-warp effect of restoring one
(e.g., if your last full backup ran a week ago). When these problems
occur, fixing them can be far simpler than you might think.
Problem 1: Corrupted System Files - Unable to Load the Operating System
A
sudden power outage or system crash can corrupt files that are part of
your operating system's essential guts. When these things happen, people
who have backups tend to just jump straight to them, but then we're at
the time warp problem—if you've already done a week's worth of work
since the last backup, that data is lost. Instead, you should first
attempt to repair or restore just the system files.
Both
Windows and Mac OS X have these capabilities either built in, or on
their install discs. Good preparedness doesn't just mean making backups,
but also making sure these discs are safe—they can save you some major heartache.
Solution:
Windows:
Corrupt system files happen a bit more frequently in Windows, but it's
not difficult to fix most of the time. You should make use of Windows' built-in System Restore,
which basically makes daily, miniature backups of your system. It
doesn't touch your data—it just backs up system files, so it's
absolutely perfect for these sorts of problems. If you're able to boot
your PC into Safe Mode (pressing F8 while booting up should do the
trick), you can find System Restore in the System Properties settings.
If your PC won't boot all the way into Safe Mode, then you'll need your
Windows install disc. Booting into that disc will give you the option to
use System Restore right on the spot. Since it runs on a daily basis,
you can even choose how recent of a snapshot you want (just in case you
think the problem started a couple of days before everything stopped
working).
Mac: For Mac, it's pretty common that, instead of corrupted files,
that you might have broken permissions or other file system issues. You
can correct a lot of these sorts of issues by rebooting into Safe Mode
(reboot the computer while holding down the Shift key). Booting into
Safe Mode will force checking and error correction on the file system,
delete cached files, and start the computer in a limited working state
that doesn't include anything but the basics. Once fully booted into
Safe Mode, you can reboot the computer normally again, and hope that the
problem was taken care of in that automated process.
If it wasn't fixed by that, you can use your OS X install disc to run Disk Utility and try to repair the disk.
Don't worry, it's automatic, too. Boot into the install disc by
inserting it into the drive, and rebooting the computer while holding
down the C key (once it starts booting the installation disc you can let
go of the key). After it loads and has you choose a language, click on
the Installer menu at the top of the screen, and select Disk Utility.
Inside Disk Utility, choose the tab for First Aid, find your hard disk
in the sidebar and expand it to see the partitions, then select yours
(usually named something like "Macintosh HD"). Click the Repair button,
and then wait patiently for it to finish. If all goes well, it should
give a pleasant report that the disk has been repaired. If, instead, you
get a notice about corrupted files, then you can take the final step
and restore your system.
Restoring all system files in OS X is
actually pretty simple, because you just reinstall the OS. Assuming
everything goes alright during the installation (basically, as long as
the hard drive's healthy), this will only replace the system files, leaving your personal files untouched and as you left them.
Problem 2: You Can't Log In - Either You Forgot Your Password, or it Got Changed on You
If
it's just an issue of a forgotten password that's left you unable to
log in (or an unfunny prank by someone who knows what it is), you can
reset it pretty easily (and get back to work without hassling with
restoring a backup):
Solution:
Windows: For Windows users, you need to take action prior
to losing access to the account (which means you should do it right
now). Go to your Control Panel and select "User Accounts and Family
Safety," then click on User Accounts. There you'll find the option to
create a Password Reset Disk—just follow the instructions and keep it
somewhere safe. If you lose access to your account, you can use this to
get back in with a brand new password.
Mac: For
Mac OS X, boot into the install disc and choose your language, then
choose "Reset Password" from the Utilities menu. If that sounds too
easy, it's because it probably is—any OS X install disc for the same
version installed on the computer will work.
If
something more mysterious is going on with your user account, you need a
way to get back into your system to try grabbing some of your more
recent files, and to investigate what caused the issue. As a safety net,
you can keep a separate administrator account on the system, just so
you can get back in and check things out. If something malicious caused
the lockout, your secondary account should be able to delete the
offending files. If not, Windows users can use System Restore, and Mac
users can drop in a fresh OS X system install.
Problem 3: Lost Data - Or when You Accidentally Delete Your Life's Work
If
you accidentally delete a large chunk of your data—but not anything
that affects the OS itself—then a full system restore is definitely an
option, but it should be the last one you turn to.
Solution:
Partial Restore From Backup: If you've taken the time to ensure that your backups are accessible,
specifically for instances like this, you can simply grab the now lost
data from the most recent backup you made. If your backups are
compressed into enormous archives, then they're not exactly quick or
easy to work with in a case like this. Making full backups that are
basically mirrored copies of your hard drive is far more useful, since
you can use them for any amount of restoring that may be needed.
Use a Rescue CD: A rescue CD, like Disk Drill for Mac or previously mentionedRecuva
for Windows, can scan your drive for deleted files and restore them if
possible. It's usually not a problem if it hasn't been very long since
they were deleted.
Save Redundantly: Using a
rescue CD has a decent chance of working, but it's easier to
preemptively cover the possibly of accidental deletions by saving
important files to two different locations (preferably on two different
hard drives), or by keeping a daily backup of your most important data.
It's not practical in any way to back up your entire system every day,
but it's not too much of a hassle to back up a few critical files—like
your My Documents folder. If your daily work is seriously important,
it'd be best to practice both methods, and invest in a small external
hard drive since it can hold both your small daily backups, and also
serve as the space to use for double-saving important files.
Cloud Storage: This is when it's also a good idea to have a backup plan for your backup plan. Use cloud storage services like the beloved Dropbox
for important files, use a service like Flickr or Picasa Web Albums for
your photos (or even store them as regular files in a service like SugarSync). Amazon Cloud Drive even allows you to store 5GB worth of music files without buying anything. You don't have to pay a thing if you use multiple free plans and spread your data across them.
I forgot administrator password of windows server 2008 r2.
I have no idea on log on that server without administrator password.
Does somebody tell me how to recover the lost password for my win server
2008? – Question from Microsoft community.
If we forget the administrator of a windows server 2008 (r2), how to
do? This post shows how to reset a lost password for windows server 2008
with password software.
Tips: To reset windows server 2008 (r2) password offline, a USB flash drive or a CD/DVD burn device and a blank CD/DVD is need.
1. Reset windows server 2008 administrator password with Spower Password Reset Special.
Tips: this method not only work to reset windows
server 2008 domain administrator password, but also work with a local
administrator password on windows server 2008 (r2).
Spower Windows Password Reset Special can help to reset local and
domain password for windows 2000/xp/2003/vista/win7/2008 without any
password.
Follow the instructions below to make a 2008 password disk, and reset
a new password to the administrator user with the password disk.
2. Reset windows server 2008 local administrator password with Windows Password Rescuer Advanced (WPRA).
With Windows Password Rescuer Professional, the administrator password can be reset in a few click. Step as follow:
1. Download Windows Password Rescuer Advanced (trial version) and install it.
2. Make a 2008 password reset disk with WPRP. Insert a USB or CD disk, and click the burn button to make a password disk.
3. Boot the locked windows server computer from 2008 password reset disk.
4. Reset the lost password for administrator. Click administrator
account to make it selected, and then click reset button to create a new
password for it.
With Ophcrack live cd, we can recover Windows 7, vista and xp password easily. Here shows you the step by step tutorial to hack windows 7 password with Ophcrack.
Something about Ophcrack . Ophcrack is a free open source windows password hack program. Ophcrack hack windows password using by using rainbow tables.
What Ophcrack live cd can do. Ophcrack live cd can help you recover windows the most lost windows password. With free Ophcrack live cd which has a default rainbow table can help to crack short Windows password in a few minutes. If you want to hack long windows password, you need to buy one or more large (larger then 10G) rainbow tables.
Note: You have to know, even with the largest rainbow tables , still many passwords cannot be crack in windows vista and windows 7.
How Ophcrack works. Ophcrack is known as cracking
windows password through big rainbow tables. Ophcrack read LM or NTLM
hashes from SAM file, and then it find the hash value in rainbow
tables. So the more complex password need the larger rainbow table to
crack.
Get Ophcrack live cd. Ophcrack has two different live cds for different Windows system, one for Windows xp, one for Windows vista and Windows 7. To hack Windows 7 password, we need to download ophcrack Vista LiveCD.
What you download will be an ISO file – ophcrack-vista-livecd-2.3.1.iso.
Use Ophcrack live cd to hack Windows 7 password. If have downloaded Ophcrack Vista LiveCD, follow the steps below to hack windows 7 password.
Step 1 – Burn Ophcrack Vista Live CD to a CD or DVD disc. Use a ISO file burn program to burn the ophcrack-vista-livecd-2.3.1.iso to the cd or dvd disc. Note: You cannot burn the iso file to the cd or dvd disc like burning a common file. You should use the Burn ISO Image option the burn program provides to burn the iso file to cd or dvd disc, or you will fail to boot the computer from Ophcrack Vista Live CD. If you have trouble in this operation, you can refer to How to burn ISO image file to CD/DVD disc.
Step 2 – Boot the computer which will be hacked from Ophcrack Vista Live CD. Note: The following steps should happen on the computer you want to hack, instead happen on the computer you are using.
2.1 Insert Ophcrack Vista Live CD to the computer.
2.2 Access to BIOS Setup Utility to Set the CD/DVD-ROM as the first boot device.
2.3 Press 10 to save BIOS setting and then restart computer.
Tip: If you fail to boot from Ophcrack Vista Live
CD, you should check whether you used the right way to burn the ISO file
to CD/DVD disc, and check whether you have set the computer to boot
from CD/DVD-ROM.
Step 3 – Get the password has been hacked by Ophcrack.
After boot from Ophcrack Vista Live CD, you do not need to do anything.
What you should just do is write down the password has been hack. The user column will list the user Ophcrack find in system. The NT Pwd
column will list the password has been found. If the NT Pwd field is
empty for a special user, the password has not been found yet.
Tip: If Ophcrack fail to find the password for you, you can try other password reset/recover software. Refer to How to hack windows 7 admin password in a few minutes for using another software to hack windows 7 password.
Step 4 – Resart Windows and login with the recovered password. Press the restart button of your computer or click Menu -> Logout -> Reboot system to restart computer, and then login with the hacked password.
Microsoft has strived to develop Windows
into an intuitive, user-friendly operating system. For some, though,
"user friendly" is just another way of saying "dumbed down" in an
attempt to force all users into a limited, cookie-cutter system. Power
users and IT administrators need to be able to go behind the curtain of
the friendly user interface and get down to the business of tweaking and
customizing the operating system to meet their needs. That is where
Windows 7's "GodMode" comes in.
A hidden developer shortcut creates the GodMode folder.
A more appropriate name than "GodMode" for an Easter egg feature that
gives you ultimate control over the operating system would be hard to
come up with. That said, you don't really need GodMode to be the god of
your domain--the tweaks available with GodMode already exist
independently of it, but these tricks make them far more accessible.
Let's take a look at what the Windows 7 GodMode is, how to access it,
and what playing god with Windows 7 can do for you.
What Is GodMode?
GodMode is actually a hidden (or, at least it used to be hidden)
developer shortcut in Windows 7 that provides more direct access to
features and functions of the operating system. To be clear, GodMode
doesn't add functionality. But it helps administrators work more
efficiently by collecting all these tweaks and controls in one place.
Accessing GodMode in Windows 7
Follow these steps to access GodMode:
Create a new folder wherever you want the GodMode folder to be. Right-click in Windows Explorer, select New, then click Folder.
Next, rename the folder. You can name the folder anything you like as
long as you add a period followed by this exact text string:
{ED7BA470-8E54-465E-825C-99712043E01C}
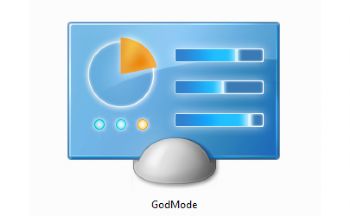
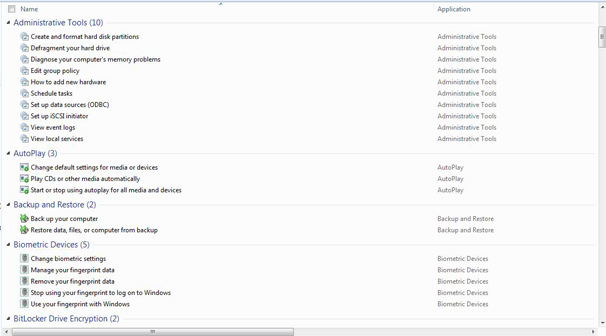
The folder icon should be replaced by the Control Panel icon, and the
folder should now be filled with a variety of tweaks and tools (see
figure at lower right).
The GodMode folder provides access to a variety of tools and tweaks. (Click for larger image.)
But, wait. There's more! The truth is, there isn't just one "GodMode."
Windows 7 has an entire pantheon of GodModes, with a variety of hidden
folders you can set up using different, unique text strings, including
special folders for biometric settings, printers, credentials and
logins, the firewall and security, and many other features and functions
of Windows 7.
A post in a Microsoft forum
by Auri Rahimzadeh provides a short script that will quickly create the
GodMode folders. Copy and paste the following text (immediately below
this paragraph) into Notepad. Name the file "godmodes.bat" and save it
on your hard drive in the location where you would like the folders to
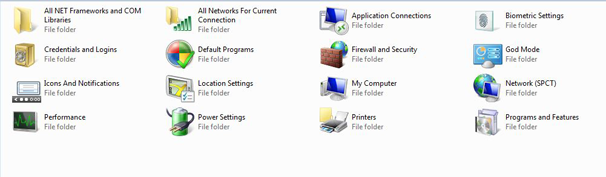
be. Running this script will create a new folder called Special Folders
that will contain all of the developer shortcut folders (as shown in the
clickable thumbnail figure below). Also, by changing the text where it
says "Special Folders" in the first two lines of the script, you could
rename the new folder anything you'd like.
mkdir "Special Folders
cd ".\Special Folders
mkdir "God Mode.{ED7BA470-8E54-465E-825C-99712043E01C}
mkdir "Location Settings.{00C6D95F-329C-409a-81D7-C46C66EA7F33}
mkdir "Biometric Settings.{0142e4d0-fb7a-11dc-ba4a-000ffe7ab428}
mkdir "Power Settings.{025A5937-A6BE-4686-A844-36FE4BEC8B6D}
mkdir "Icons And Notifications.{05d7b0f4-2121-4eff-bf6b-ed3f69b894d9}
mkdir "Credentials and Logins.{1206F5F1-0569-412C-8FEC-3204630DFB70}
mkdir "Programs and Features.{15eae92e-f17a-4431-9f28-805e482dafd4}
mkdir "Default Programs.{17cd9488-1228-4b2f-88ce-4298e93e0966}
mkdir "All NET Frameworks and COM Libraries.{1D2680C9-0E2A-469d-B787-065558BC7D43}
mkdir "All Networks For Current Connection.{1FA9085F-25A2-489B-85D4-86326EEDCD87}
mkdir "Network.{208D2C60-3AEA-1069-A2D7-08002B30309D}
mkdir "My Computer.{20D04FE0-3AEA-1069-A2D8-08002B30309D}
mkdir "Printers.{2227A280-3AEA-1069-A2DE-08002B30309D}
mkdir "Application Connections.{241D7C96-F8BF-4F85-B01F-E2B043341A4B}
mkdir "Firewall and Security.{4026492F-2F69-46B8-B9BF-5654FC07E423}
mkdir "Performance.{78F3955E-3B90-4184-BD14-5397C15F1EFC}
Putting GodMode to Use
The collection of developer shortcut folders created by the Special Folders script. (Click for larger image.)Okay,
so now you have a bunch of folders filled with tools and tweaks that
you already had access to. Congratulations. The question to consider is
whether or not these GodMode folders serve any purpose. Do they make it
easier to work with and configure Windows 7? Do they make your life as
an IT administrator easier? Well, let's see.
Let's say you want to defragment a hard drive. You could go through the normal steps of clicking on Start, All Programs, Accessories, System Tools, Disk Defrgamenter.
However, that is a fair amount of clicking, and it assumes that you
remember where the Disk Defragmenter tool is located. Or, you can open
the GodMode folder, go to the Administrative Tools section, and click on
Defragment your hard drive.
Another example is adjusting the display settings--perhaps to mirror or
extend the display landscape onto a second monitor. You can click Start, Control Panel, Display, and then select Change display settings from the panel on the left. Or you can go into the GodMode folder and just click on Change display settings under the Display section.
In both examples, you don't have to enable the GodMode folder
to accomplish the task. The tools exist already, and GodMode is really
nothing more than a regrouping of those tools.
But it is a convenient regrouping. IT admins and power users can also
make effective use of the Windows Search function to navigate to tools
more efficiently. However, that requires knowing up front what tool you
are looking for, and making sure you enter the right keyword or phrase
for Windows to locate it for you.
What GodMode does--aside from conveniently regrouping common tools that
are already available--is list the tools in logical categories based on
the types of tasks an IT admin might need to perform. And the tools are
named for the way that IT admins think when they want to perform those
tasks. For instance, you can get to BitLocker Drive Encryption through
the Control Panel, but in the GodMode folder it is listed in the form of
a task that makes sense: "Protect your computer by encrypting data on
your disk."
There you have it. It is not quite as magical or all-powerful as the
name implies. But GodMode--in all of its forms and folders--can be a
valuable tool and make your life simpler.
Windows 7 lets you search online repositories as well as your PC
Whether
it's tweaks to get the desktop the way you want it, tips for
troubleshooting or ways to squeeze more performance from Windows 7,
we've got it covered.
We've updated our popular Windows 7 tips
article with a load of new ones, including how to recover locked-up
apps, how to extend your jumplists, leave a Windows 7 Homegroup, and
more. Read on for 85 tips to help you get the best from Windows 7.
1. Problem Steps Recorder
As
the local PC guru you're probably very used to friends and family
asking for help with their computer problems, yet having no idea how to
clearly describe what's going on. It's frustrating, but Microsoft feels
your pain, and Windows 7 will include an excellent new solution in the
Problem Steps Recorder.
When any app starts misbehaving under
Windows 7 then all your friends need do is click Start, type PSR and
press Enter, then click Start Record. If they then work through whatever
they're doing then the Problem Steps Recorder will record every click
and keypress, take screen grabs, and package everything up into a single
zipped MHTML file when they're finished, ready for emailing to you.
It's quick, easy and effective, and will save you hours of
troubleshooting time.
2. Burn images
Windows
7 finally introduces a feature that other operating systems have had
for years - the ability to burn ISO images to CDs or DVDs. And it
couldn't be much easier to use. Just double-click the ISO image, choose
the drive with the blank disc, click Burn and watch as your disc is
created.
3. Create and mount VHD files
Microsoft's
Virtual PC creates its virtual machine hard drives in VHD files, and
Windows 7 can now mount these directly so you can access them in the
host system. Click Start, type diskmgmt.msc and press Enter, then click
Action > Attach VHD and choose the file you'd like to mount. It will
then appear as a virtual drive in Explorer and can be accessed, copied
or written just like any other drive.
Click Action > Create VHD
and you can now create a new virtual drive of your own (right-click it,
select Initialise Disk, and after it's set up right-click the
unallocated space and select New Simple Volume to set this up). Again,
you'll be left with a virtual drive that behaves just like any other,
where you can drag and drop files, install programs, test partitioning
software or do whatever you like. But it's actually just this VHD file
on your real hard drive which you can easily back up or share with
others. Right-click the disk (that's the left-hand label that says "Disk
2" or whatever) and select Detach VHD to remove it.
The command
line DISKPART utility has also been upgraded with tools to detach a VHD
file, and an EXPAND command to increase a virtual disk's maximum size.
Don't play around with this unless you know what you're doing, though -
it's all too easy to trash your system.
4. Troubleshoot problems
If
some part of Windows 7 is behaving strangely, and you don't know why,
then click Control Panel > Find and fix problems (or
'Troubleshooting') to access the new troubleshooting packs. These are
simple wizards that will resolve common problems, check your settings,
clean up your system and more.
5. Startup repair
If
you've downloaded Windows 7 (and even if you haven't) it's a good idea
to create a system repair disc straight away in case you run into
problems booting the OS later on. Click Start > Maintenance >
Create a System Repair Disc, and let Windows 7 build a bootable
emergency disc. If the worst does happen then it could be the only way
to get your PC running again.
6. Take control
Tired
of the kids installing dubious software or running applications you'd
rather they left alone? AppLocker is a new Windows 7 feature that
ensures users can only run the programs you specify. Don't worry, that's
easier to set up than it sounds: you can create a rule to allow
everything signed by a particular publisher, so choose Microsoft, say,
and that one rule will let you run all signed Microsoft applications.
Launch GPEDIT.MSC and go to Computer Configuration > Windows Settings
> Security Settings > Application Control Policies > AppLocker
to get a feel for how this works.
7. Calculate more
At
first glance the Windows 7 calculator looks just like Vista's version,
but explore the Mode menu and you'll see powerful new Statistics and
Programmer views. And if you're clueless about bitwise manipulation,
then try the Options menu instead. This offers many different unit
conversions (length, weight, volume and more), date calculations (how
many days between two dates?), and spreadsheet-type templates to help
you calculate vehicle mileage, mortgage rates and more.
Don't
take any Windows 7 applet at face value, then - there are some very
powerful new features hidden in the background. Be sure to explore every
option in all Windows applets to ensure you don't miss anything
important.
CALCULATE MORE:The new Calculator is packed with useful features and functionality
8. Switch to a projector
Windows
7 now provides a standard way to switch your display from one monitor
to another, or a projector - just press Win+P or run DisplaySwitch.exe
and choose your preferred display. (This will have no effect if you've
only one display connected.)
9. Get a power efficiency report
If
you have a laptop, you can use the efficiency calculator to get Windows
7 to generate loads of useful information about its power consumption.
Used in the right way, this can help you make huge gains in terms of
battery life and performance. To do this you must open a command prompt
as an administrator by typing 'cmd' in Start Search, and when the cmd
icon appears, right-click it and choose Run as administrator.
Then
at the command line, just type in 'powercfg -energy' (without quotes)
and hit Return, and Windows 7 will scan your system looking for ways to
improve power efficiency. It will then publish the results in an HTML
file, usually in the System32 folder. Just follow the path it gives you
to find your report.
10. Understanding System Restore
Using
System Restore in previous versions of Windows has been something of a
gamble. There's no way of telling which applications or drivers it might
affect - you just have to try it and see.
Windows 7 is different.
Right-click Computer, select Properties > System Protection >
System Restore > Next, and choose the restore point you'd like to
use. Click the new button to 'Scan for affected programs' and Windows
will tell you which (if any) programs and drivers will be deleted or
recovered by selecting this restore point. (Read our full Windows 7 System Restore tutorial.)
11. Set the time zone
System
administrators will appreciate the new command line tzutil.exe utility,
which lets you set a PC's time zone from scripts. If you wanted to set a
PC to Greenwich Mean Time, for instance, you'd use the command
tzutil /s "gmt standard time"
The
command "tzutil /g" displays the current time zone, "tzutil /l" lists
all possible time zones, and "tzutil /?" displays details on how the
command works.
12. Calibrate your screen
The
colours you see on your screen will vary depending on your monitor,
graphics cards settings, lighting and more, yet most people use the same
default Windows colour profile. And that means a digital photo you
think looks perfect might appear very poor to everybody else.
Fortunately Windows 7 now provides a Display Colour Calibration Wizard
that helps you properly set up your brightness, contrast and colour
settings, and a ClearType tuner to ensure text is crisp and sharp. Click
Start, type DCCW and press Enter to give it a try.
13. Clean up Live Essentials
Installing
Windows Live Essentials will get you the new versions of Mail, Movie
Maker, Photo Gallery and others - great. Unfortunately it also includes
other components that may be unnecessary, but if you like to keep a
clean system then these can be quickly removed.
If you left the
default "Set your search provider" option selected during installation,
for instance, Windows Live will install Choice Guard, a tool to set your
browser home page and search engine, and prevent other programs from
changing them. If this causes problems later, or you just decide you
don't need it, then Choice Guard may be removed by clicking Start,
typing msiexec /x {F0E12BBA-AD66-4022-A453-A1C8A0C4D570} and pressing
[Enter].
Windows Live Essentials also adds an ActiveX Control to
help upload your files to Windows Live SkyDrive, as well as the Windows
Live Sign-in Assistant, which makes it easier to manage and switch
between multiple Windows Live accounts. If you're sure you'll never need
either then remove them with the Control Panel "Uninstall a Program"
applet.
14. Add network support
By default
Windows Live MovieMaker won't let you import files over a network, but a
quick Registry tweak will change this. Run REGEDIT, browse to
HKEY_CURRENT_USER\Software\Microsoft\Windows Live\Movie Maker, add a
DWORD value called AllowNetworkFiles and set it to 1 to add network
support.
15. Activate XP mode
If you've old but important software that no longer runs under Windows 7, then you could try using XP Mode,
a virtual copy of XP that runs in a window on your Windows 7 desktop.
But there's a big potential problem, as XP Mode only works with systems
that have hardware virtualisation (AMD-V or Intel VT) built-in and
turned on. If you've a compatible CPU then this may just be a matter of
enabling the option in your BIOS set-up program, however some high
profile brands, including Sony Vaio, disable the setting for "security
reasons". And that blocks XP Mode from working, too.
One solution
has emerged, but it's a little risky, as essentially you'll have to
alter a byte in your laptop firmware and hope this doesn't have any
unexpected side-effects. Gulp. If you're feeling brave then take a look
at the Feature Enable Blog for the details, but don't blame us if it goes wrong.
A safer approach might be to use VirtualBox,
a virtualisation tool that doesn't insist on hardware support, but then
you will need to find a licensed copy of XP (or whatever other Windows
version your software requires) for its virtual machine.
16. Enable virtual Wi-Fi
Windows
7 includes a little-known new feature called Virtual Wi-Fi, which
effectively turns your PC or laptop into a software-based router. Any
other Wi-Fi-enabled devices within range - a desktop, laptop, an iPod
perhaps - will "see" you as a new network and, once logged on,
immediately be able to share your internet connection.
This will
only work if your wireless adapter driver supports it, though, and not
all do. Check with your adapter manufacturer and make sure you've
installed the very latest drivers to give you the best chance.
Once you have driver support then the easiest approach is to get a network tool that can set up virtual Wi-Fi for you. Virtual Router (below) is free, easy to use and should have you sharing your internet connection very quickly.
If
you don't mind working with the command line, though, maybe setting up
some batch files or scripts, then it's not that difficult to set this up
manually. See Turn your Windows 7 laptop into a wireless hotspot for more.
17. Recover locked-up apps
If
an application locks up under a previous version of Windows then there
was nothing you could do about it. A new Windows 7 option, however, can
not only explain the problem, but may get your program working again
without any loss of data.
When the lockup occurs, click Start, type RESMON and click the RESMON.EXE link to launch the Resource Monitor.
Find your frozen process in the CPU pane (it should be highlighted in red), right-click it and select Analyze Wait Chain.
If
you see at least two processes in the list, then the lowest, at the end
of the tree, is the one holding up your program. If it's not a vital
Windows component, or anything else critical, then save any work in
other open applications, check the box next to this process, click End
Process, and your locked-up program will often spring back to life.
18. Fault-Tolerant Help
Windows
7 includes a new feature called the Fault Tolerant Help (FTH), a clever
technology that looks out for unstable processes, detects those that
may be crashing due to memory issues, and applies several real-time
fixes to try and help. If these work, that's fine - if not, the fixes
will be undone and they won't be applied to that process again.
While
this is very good in theory, it can leave you confused as some
applications crash, then start working (sometimes) for no apparent
reason. So if you'd like to check if the FTH is running on your PC,
launch REGEDIT, and go to HKEY_LOCAL_MACHINE\Software\Microsoft\FTH -
any program currently being protected by the FTH will be listed in the
State key.
Experienced users may also try tweaking the FTH
settings to catch more problems, and perhaps improve system stability. A
post on Microsoft's Ask The Performance Team blog (bit.ly/d1JStu)
explains what the various FTH Registry keys mean.
19. Automatically switch your default printer
Windows
7's location-aware printing allows the operating system to
automatically switch your default printer as you move from one network
to another.
To set this up, first click Start, type Devices, and click the Devices and Printers link.
Select
a printer and click Manage Default Printers (this is only visible on a
mobile device, like a laptop - you won't see it on a PC).
Choose
the "Change my default printer when I change networks" option, select a
network, the default printer you'd like to use, and click Add.
Repeat the process for other networks available, and pick a default printer for each one.
And
now, as you connect to a new network, Windows 7 will check this list
and set the default printer to the one that you've defined.
20. Explore God Mode
Windows 7 has changed
Control Panel a little, but it's still too difficult to locate all the
applets and options that you might need. God Mode, however, while not
being particularly godlike, does offer an easier way to access
everything you could want from a single folder.
To try this out, create a new folder and rename it to: The
first part, "Everything" will be the folder name, and can be whatever
you want: "Super Control Panel", "Advanced", "God Mode" if you prefer.
The
extension, ED7BA470-8E54-465E-825C-99712043E01C, must be entered
exactly as it is here, though, including the curly brackets. When you
press [Enter] this part of the name will disappear, and double-clicking
the new folder will display shortcuts to functions in the Action Centre,
the Network and Sharing Centre, Power options, troubleshooting tools,
user accounts and others - more than 260 options in total. 21. Right-click everything
At
first glance Windows 7 bears a striking resemblance to Vista, but
there's an easy way to begin spotting the differences - just right-click
things.
Right-click an empty part of the desktop, for instance,
and you'll find a menu entry to set your screen resolution. No need to
go browsing through the display settings any more.
Right-click the
Explorer icon on the taskbar for speedy access to common system
folders: Documents, Pictures, the Windows folder, and more.
And if
you don't plan on using Internet Explorer then you probably won't want
its icon permanently displayed on the taskbar. Right-click the icon,
select 'Unpin this program from the taskbar', then go install Firefox,
instead.
22. Display the old taskbar button context menu
Right-click
a taskbar button, though, and you'll now see its jumplist menu. That's a
useful new feature, but not much help if you want to access the
minimize, maximize, or move options that used to be available.
Fortunately there's an easy way to get the old context menu back - just
hold down Ctrl and Shift as you right-click the taskbar button.
23. Desktop slideshow
Windows
7 comes with some very attractive new wallpapers, and it's not always
easy to decide which one you like the best. So why not let choose a few,
and let Windows display them all in a desktop slideshow? Right-click an
empty part of the desktop, select Personalise > Desktop Background,
then hold down Ctrl as you click on the images you like. Choose how
often you'd like the images to be changed (anything from daily to once
every 10 seconds), select Shuffle if you'd like the backgrounds to
appear in a random order, then click Save Changes and enjoy the show.
DESKTOP SLIDESHOW:Select multiple background images and Windows will cycle through them
24. RSS-powered wallpaper
And
if a slideshow based on your standard wallpaper isn't enough, then you
can always create a theme that extracts images from an RSS feed. For
example, Long Zheng has created a few sample themes to illustrate how it works. Jamie Thompson takes this even further, with a theme that always displays the latest BBC news and weather on your desktop. And MakeUseOf
have a quick and easy tutorial showing how RSS can get you those
gorgeous Bing photographs as your wallpaper. Or you can watch our custom theme video tutorial.
25. Customise the log-on screen
Changing
the Windows log-on screen used to involve some complicated and
potentially dangerous hacks, but not any more - Windows 7 makes it easy.
First, browse to
HKEY_LOCAL_MACHINE\Software\Microsoft\Windows\CurrentVersion\Authentication\LogonUI\Background
in REGEDIT, double-click the DWORD key called OEMBackground (not there?
Create it) and set its value to 1.
Now find a background image
you'd like to use. Make sure it's less than 256KB in size, and matches
the aspect ratio of your screen as it'll be stretched to fit.
Next,
copy that image into the %windir%\system32\oobe\info\backgrounds folder
(create the info\backgrounds folders if they don't exist). Rename the
image to backgroundDefault.jpg, reboot, and you should now have a custom
log-on image.
Alternatively, use a free tweaking tool to handle everything for you. Logon Changer displays a preview so you can see how the log-on screen will look without rebooting, while the Logon Screen Rotator accepts multiple images and will display a different one every time you log on.
26. Recover screen space
The
new Windows 7 taskbar acts as one big quick launch toolbar that can
hold whatever program shortcuts you like (just right-click one and
select Pin To Taskbar). And that's fine, except it does consume a little
more screen real estate than we'd like. Shrink it to a more manageable
size by right-clicking the Start orb, then Properties > Taskbar >
Use small icons > OK.
27. Enjoy a retro taskbar
Windows
7 now combines taskbar buttons in a way that saves space, but also
makes it more difficult to tell at a glance whether an icon represents a
running application or a shortcut. If you prefer a more traditional
approach, then right-click the taskbar, select Properties, and set
Taskbar Buttons to "Combine when taskbar is full". You'll now get a
clear and separate button for each running application, making them much
easier to identify.
28. Remove taskbar buttons
One
problem with the previous tip is the buttons will gobble up valuable
taskbar real estate, but you can reduce the impact of this by removing
their text captions. Launch REGEDIT, browse to HKEY_CURRENT_USER\Control
Panel\Desktop\WindowMetrics, add a string called MinWidth, set it to
54, and reboot to see the results.
29. Restore the Quick Launch Toolbar
If
you're unhappy with the new taskbar, even after shrinking it, then it
only takes a moment to restore the old Quick Launch Toolbar.
Right-click
the taskbar, choose Toolbars > New Toolbar, type
"%UserProfile%\AppData\Roaming\Microsoft\Internet Explorer\Quick Launch"
(less the quotes) into the Folder box and click Select Folder.
Now
right-click the taskbar, clear 'Lock the taskbar', and you should see
the Quick Launch toolbar, probably to the right. Right-click its
divider, clear Show Text and Show Title to minimise the space it takes
up. Complete the job by right-clicking the bar and selecting View >
Small Icons for the true retro look.
30. Custom power switch
By
default, Windows 7 displays a plain text 'Shut down' button on the
Start menu, but it only takes a moment to change this action to
something else. If you reboot your PC a few times every day then that
might make more sense as a default action: right-click the Start orb,
select Properties and set the 'Power boot action' to 'Restart' to make
it happen.
31. Auto arrange your desktop
If
your Windows 7 desktop has icons scattered everywhere then you could
right-click it and select View > Auto arrange, just as in Vista. But a
simpler solution is just to press and hold down F5, and Windows will
automatically arrange its icons for you.
32. Disable smart window arrangement
Windows
7 features interesting new ways to intelligently arrange your windows,
so that (for example) if you drag a window to the top of the screen then
it will maximise. We like the new system, but if you find it
distracting then it's easily disabled. Run REGEDIT, go to
HKEY_CURRENT_USER\Control Panel\Desktop, set WindowArrangementActive to
0, reboot, and your windows will behave just as they always did.
33. Browse your tasks
If
you prefer the keyboard over the mouse, you will love browsing the
taskbar using this nifty shortcut. Press Windows and T, and you move the
focus to the left-most icon on the taskbar. Then use your arrow keys to
change the focus to other icons, and you get a live preview of every
window.
34. Display your drives
Click
Computer in Windows 7 and you might see a strange lack of drives, but
don't panic, it's just Microsoft trying to be helpful: drives like
memory card readers are no longer displayed if they're empty. We think
it's an improvement, but if you disagree then it's easy to get your
empty drives back. Launch Explorer, click Tools > Folder Options >
View and clear 'Hide empty drives in the computer folder'.
35. See more detail
The
new and improved Windows 7 magnifier offers a much easier way to zoom
in on any area of the screen. Launch it and you can now define a scale
factor and docking position, and once activated it can track your
keyboard focus around the screen. Press Tab as you move around a dialog
box, say, and it'll automatically zoom in on the currently active
control.
36. Extend your jumplists
By
default a jumplist will display up to 10 items, but it can often be
useful to extend this and add a few more. Right-click Start, select
Properties > Customize and set "Number of recent items to display in
Jump Lists" to the figure you need.
37. Disable Aero Peek
Hover
your mouse cursor over the bottom right hand corner of the screen and
Windows 7 will hide open windows, showing you the desktop. Seems like a
good idea to us, but if the feature gets in your way then it's easy to
turn off. Simply right-click the Start orb, select Properties >
Taskbar and clear the "Use Aero Peek to preview the desktop" box.
38. Pin a drive to the taskbar
The taskbar isn't just for apps and documents. With just a few seconds work you can pin drive icons there, too.
Right-click
an empty part of the desktop, select New > Text File, and rename the
file to drive.exe. Drag and drop this onto your taskbar, then delete
the original file.
Right-click your new "drive.exe" taskbar
button, then right-click its file name and select Properties. Change the
contents of both the Target and Start In boxes to point at the drive or
folder of your choice, perhaps click Change Icon to choose an
appropriate drive icon, and you're done - that drive or folder is now
available at a click.
39. Expand your taskbar previews
Move
your mouse cursor over a Windows 7 taskbar button and you'll see a
small preview of the application window. To make this larger, launch
REGEDIT, browse to
HKEY_CURRENT_USER\Software\Microsoft\Windows\CurrentVersion\Explorer\Taskband,
right-click in the right hand pane and create a new DWORD value called
MinThumbSizePx. Double-click this, choose the Decimal option, set the
value to 350 and reboot to see the results. Tweak the value again to
fine-tune the results, or delete it to return to the default thumbnail
size.
40. Hiding the Windows Live Messenger icon
If
you use Windows Live Messenger a lot, you'll have noticed that the icon
now resides on the taskbar, where you can easily change status and
quickly send an IM to someone. If you prefer to keep Windows Live
Messenger in the system tray, where it's been for previous releases,
just close Windows Live Messenger, edit the shortcut properties and set
the application to run in Windows Vista compatibility mode.
41. Customise UAC
Windows
Vista's User Account Control was a good idea in practice, but poor
implementation put many people off - it raised far too many alerts.
Fortunately Windows 7 displays less warnings by default, and lets you
further fine-tune UAC to suit your preferred balance between security
and a pop-up free life (Start > Control Panel > Change User
Account Control Settings).
42. Use Sticky Notes
The
Sticky Notes app is both simpler and more useful in Windows 7. Launch
StikyNot.exe and you can type notes at the keyboard; right-click a note
to change its colour; click the + sign on the note title bar to add
another note; and click a note and press Alt + 4 to close the note
windows (your notes are automatically saved).
43. Open folder in new process
By
default Windows 7 opens folders in the same process. This saves system
resources, but means one folder crash can bring down the entire shell.
If your system seems unstable, or you're doing something in Explorer
that regularly seems to causes crashes, then open Computer, hold down
Shift, right-click on your drive and select Open in New Process. The
folder will now be launched in a separate process, and so a crash is
less likely to affect anything else.
44. Watch more videos
Windows
Media Player 12 is a powerful program, but it still won't play all the
audio and video files you'll find online. Fortunately the first freeware
Windows 7 codecs package [shark007.net/win7codecs.html] has been
released, and installing it could get your troublesome multimedia files
playing again.
45. Preview fonts
Open the
Fonts window in Windows XP and Vista and you'll see the font names,
probably with icons to tell you whether they're TrueType or OpenType,
but that's about it. Windows 7 sees some useful font-related
improvements.
Open the new fonts window and you'll find a little
preview for every font, giving you a quick idea of how they're going to
look.
The tedium of scrolling through multiple entries for each
family, like Times New Roman, Times New Roman Bold, Times New Roman Bold
Italic and so on, has finally ended. There's now just a single entry
for each font (though you can still see all other members of the
family).
And there's a new OpenType font, Gabriola, added to the
mix. It's an attractive script font, well worth a try the next time you
need a stylish document that stands out from the crowd.
46. Restore your gadgets
Windows
7 has tightened up its security by refusing to run gadgets if UAC has
been turned off, so limiting the damage malicious unsigned gadgets can
do to your system. If you've disabled UAC, miss your gadgets and are
happy to accept the security risk, though, there's an easy Registry way
to get everything back to normal. Run REGEDIT, go to
HKEY_LOCAL_MACHINE\SOFTWARE\Microsoft\Windows\CurrentVersion\Sidebar\Settings,
create a new DWORD value called AllowElevatedProcess and set it to 1.
Your gadgets should start working again right away.
47. New WordPad formats
By
default WordPad will save documents in Rich Text Format, just as
before. But browse the Save As Format list and you'll see you can also
save (or open, actually) files in the Office 2007 .docx or OpenDocument
.odt formats.
48. Protect your data
USB
flash drives are convenient, portable, and very easy to lose. Which is a
problem, especially if they're carrying sensitive data. Fortunately
Windows 7 has the solution: encrypt your documents with an extension of
Microsoft's BitLocker technology, and only someone with the password
will be able to access it. Right-click your USB flash drive, select Turn
on BitLocker and follow the instructions to protect your private files.
PROTECT YOUR DATA:Your USB flash drives can easily be encrypted with BitLocker
49. Minimise quickly with shake
If
you have multiple windows open on your desktop and things are getting
too cluttered, it used to be a time-consuming process to close them all
down. In Windows 7 you can use the Aero Shake feature to minimise
everything in seconds, using a cool mouse gesture. Grab the title bar of
the window you wish to keep open and give it a shake, and rejoice in a
clear desktop area.
50. Configure your favourite music
The
Windows 7 Media Centre now comes with an option to play your favourite
music, which by default creates a changing list of songs based on your
ratings, how often you play them, and when they were added (it's assumed
you'll prefer songs you've added in the last 30 days). If this doesn't
work then you can tweak how Media Centre decides what a "favourite" tune
is- click Tasks > Settings > Music > Favourite Music and
configure the program to suit your needs.
51. Customise System Restore
There
was very little you could do to configure System Restore in Vista, but
Windows 7 improves the situation with a couple of useful setup options.
Click
the Start orb, right-click Computer and select Properties > System
Protection > Configure, and set the Max Usage value to a size that
suits your needs (larger to hold more restore points, smaller to save
disk space).
And if you don't need System Restore to save Windows
settings then choose the "Only restore previous versions of files"
option. Windows 7 won't back up your Registry, which means you'll
squeeze more restore points and file backups into the available disk
space. System Restore is much less likely to get an unbootable PC
working again, though, so use this trick at your own risk.
52. Run As
Hold
down Shift, right-click any program shortcut, and you'll see an option
to run the program as a different user, handy if you're logged in to the
kids' limited account and need to run something with higher privileges.
This isn't really a new feature - Windows XP had a Run As option that
did the same thing - but Microsoft stripped it out of Vista, so it's
good to see it's had a change of heart.
53. Search privacy
By
default Windows 7 will remember your PC search queries, and display the
most recent examples when searching in Windows Explorer. If you're
sharing a PC and don't want everyone to see your searches, then launch
GPEDIT.MSC, go to User Configuration > Administrative Templates >
Windows Components > Windows Explorer, double-click "Turn off display
of recent search entries..." and click Enabled > OK.
54. Tweak PC volume
By
default Windows 7 will now automatically reduce the volume of your PC's
sounds whenever it detects you're making or receiving PC-based phone
calls. If this proves annoying (or maybe you'd like it to turn off other
sounds altogether) then you can easily change the settings accordingly.
Just right-click the speaker icon in your taskbar, select Sounds >
Communications, and tell Windows what you'd like it to do.
55. Rearrange the system tray
With
Windows 7 we finally see system tray icons behave in a similar way to
everything else on the taskbar. So if you want to rearrange them, then
go right ahead, just drag and drop them into the order you like. You can
even move important icons outside of the tray, drop them onto the
desktop, then put them back when you no longer need to keep an eye on
them.
56. Extend your battery life
Windows 7
includes new power options that will help to improve your notebook's
battery life. To see them, click Start, type Power Options and click the
Power Options link, then click Change Plan Settings for your current
plan and select Change Advanced Settings. Expand Multimedia Settings,
for instance, and you'll see a new "playing video" setting that can be
set to optimise power savings rather than performance. Browse through
the other settings and ensure they're set up to suit your needs.
57. Write crash dump files
Windows
7 won't create memory.dmp crash files if you've less than 25GB of free
hard drive space, annoying if you've installed the Windows debugging
tools and want to diagnose your crashes. You can turn this feature off,
though: browse to
HKEY_LOCAL_MACHINE\SYSTEM\CurrentControlSet\Control\CrashControl, create
a new DWORD value called AlwaysKeepMemoryDump, set it to 1, and the
crash dump file will now always be saved.
58. Protect your data
If
you have confidential files in a particular folder or two, and would
like to keep them away from other network users, then right-click the
folder, select Share With > Nobody, and they'll be made private, for
your eyes only (or your user account, anyway).
59. Reorganise the taskbar
Windows
7 taskbar buttons are now movable - feel free to drag, drop and
otherwise reorganise them to suit your needs. And then remember that
each button can be launched by holding with the Windows key and pressing
1 to activate the first, 2 the second and so on, up to 0 for the tenth.
60. Repair your PC
If
Windows 7 won't start, you may not need an installation or repair disc
any more, as the repair environment is now usually installed on your
hard drive. Press [F8] as your PC starts, and if you see a "Repair Your
Computer" option, choose that to see the full range of Windows 7
recovery tools.
61. ReadyBoost revamped
If
you were unimpressed by ReadyBoost in Vista, it may be worth trying the
technology again under Windows 7. The operating system now allows you
to combine multiple USB drives, each with larger caches, to deliver an
extra speed boost.
62. Fixing Windows 7 N
If
you have Windows 7 N then this means you'll be missing key multimedia
applications, like Media Player, Media Centre, DVD Maker and more. But
that's not all. You also won't have some of the subsystems required by
third-party apps like Nero MultiMedia Suite, which means that even if
they install, you could have problems getting them to work correctly.
Fortunately
there's an easy fix, though, as the missing components are available in
the form of Microsoft's Windows Media Pack. If you're currently having
media-related issues on a Windows 7 N installation, grab your copy from support.microsoft.com/kb/968211.
63. Find bottlenecks
From
what we've seen so far Windows 7 is already performing better than
Vista, but if your PC seems sluggish then it's now much easier to
uncover the bottleneck. Click Start, type RESMON and press Enter to
launch the Resource Monitor, then click the CPU, Memory, Disk or Network
tabs. Windows 7 will immediately show which processes are hogging the
most system resources.
The CPU view is particularly useful, and
provides something like a more powerful version of Task Manager. If a
program has locked up, for example, then right-click its name in the
list and select Analyze Process. Windows will then try to tell you why
it's hanging - the program might be waiting for another process, perhaps
- which could give you the information you need to fix the problem.
FIND BOTTLENECKS:Resource monitor keeps a careful eye on exactly how your PC is being used
64. Keyboard shortcuts
Windows 7 supports several useful new keyboard shortcuts.
Alt+P Display/ hide the Explorer preview pane
Windows Logo+G Display gadgets in front of other windows
Windows Logo++ (plus key) Zoom in, where appropriate
Windows Logo+- (minus key) Zoom out, where appropriate
Windows Logo+Up Maximise the current window
Windows Logo+Down Minimise the current window
Windows Logo+Left Snap to the left hand side of the screen
Windows Logo+Right Snap to the right hand side of the screen
Windows Logo+Home Minimise/ restore everything except the current window
65. Drag and drop to the command line
When
working at the command line you'll often need to access files, which
usually means typing lengthy paths and hoping you've got them right. But
Windows 7 offers an easier way. Simply drag and drop the file onto your
command window and the full path will appear, complete with quotes and
ready to be used.
This feature isn't entirely new: you could do
this in Windows XP, too, but drag and drop support disappeared in Vista.
There does seem to be a new Windows 7 complication, though, in that it
only seems to work when you open the command prompt as a regular user.
Run cmd.exe as an administrator and, while it accepts dropped files, the
path doesn't appear.
66. Customise your jumplists
Right-click
an icon on your taskbar, perhaps Notepad, and you'll see a jumplist
menu that provides easy access to the documents you've been working on
recently. But maybe there's another document that you'd like to be
always available? Then drag and drop it onto the taskbar icon, and it'll
be pinned to the top of the jumplist for easier access. Click the pin
to the right of the file name, or right-click it and select "Unpin from
this list" when you need to remove it.
67. Faster program launches
If
you've launched one instance of a program but want to start another,
then don't work your way back through the Start menu. It's much quicker
to just hold down Shift and click on the program's icon (or middle-click
it), and Windows 7 will start a new instance for you.
68. Speedy video access
Want
faster access to your Videos folder? Windows 7 now lets you add it to
the Start menu. Just right-click the Start orb, click Properties >
Start Menu > Customize, and set the Videos option to "Display as a
link". If you've a TV tuner that works with Windows 7 then you'll
appreciate the new option to display the Recorded TV folder on the Start
menu, too.
69. Run web searches
The
Windows 7 search tool can now be easily extended to search online
resources, just as long as someone creates an appropriate search
connector. To add Flickr support, say, visit I Started Something,
click Download the Connector, choose the Open option and watch as it's
downloaded (the file is tiny, it'll only take a moment). A "Flickr
Search" option will be added to your Searches folder, and you'll be able
to search images from your desktop.
A multitude of other ready-made searches, such as Google and YouTube, can be downloaded from the windowsclub.com website.
70. Schedule Media Centre downloads
You
can now tell Windows Media Centre to download data at a specific time,
perhaps overnight, a useful way to prevent it sapping your bandwidth for
the rest of the day. Launch Media Centre, go to Tasks > Settings
> General > Automatic Download Options, and set the download start
and stop times that you'd like it to use.
71. Multi-threaded Robocopies
Anyone
who's ever used the excellent command-line robocopy tool will
appreciate the new switches introduced with Windows 7. Our favourite,
/MT, can improve speed by carrying out multi-threaded copies with the
number of threads you specify (you can have up to 128, though that might
be going a little too far). Enter robocopy /? at a command line for the
full details.
72. Load IE faster
Some
Internet Explorer add-ons can take a while to start, dragging down the
browser's performance, but at least IE8 can now point a finger at the
worst resource hogs. Click Tools > Manage Add-ons, check the Load
Time in the right-hand column, and you'll immediately see which browser
extensions are slowing you down.
73. An Alt+Tab alternative
You
want to access one of the five Explorer windows you have open, but
there are so many other programs running that Alt+Tab makes it hard to
pick out what you need. The solution? Hold down the Ctrl key while you
click on the Explorer icon. Windows 7 will then cycle through the
Explorer windows only, a much quicker way to locate the right one. And
of course this works with any application that has multiple windows
open.
74. Block annoying alerts
Just like
Vista, Windows 7 will display a suitably stern warning if it thinks your
antivirus, firewall or other security settings are incorrect.
But
unlike Vista, if you disagree then you can now turn off alerts on
individual topics. If you no longer want to see warnings just because
you've dared to turn off the Windows firewall, say, then click Control
Panel > System and Security > Action Centre > Change Action
Centre settings, clear the Network Firewall box and click OK.
75. Parallel defrags
The
standard Windows 7 defragger offers a little more control than we saw
in Vista, and the command line version also has some interesting new
features. The /r switch will defrag multiple drives in parallel, for
instance (they'll obviously need to be physically separate drives for
this to be useful). The /h switch runs the defrag at a higher than
normal priority, and the /u switch provides regular progress reports so
you can see exactly what's going on. Enter the command
defrag /c /h /u /r
in a command window to speedily defrag a system with multiple drives, or enter defrag /? to view the new options for yourself.
76. Fix Explorer
The
Windows 7 Explorer has a couple of potential annoyances. Launching
Computer will no longer display system folders like Control Panel or
Recycle Bin, for instance. And if you're drilling down through a
complicated folder structure in the right-hand pane of Explorer, the
left-hand tree won't always expand to follow what you're doing, which
can make it more difficult to see exactly where you are. Fortunately
there's a quick fix: click Organize > Folder and Search Options,
check "Show all folders" and "Automatically expand to current folder",
and click OK.
77. Faster file handing
If
you hold down Shift while right-clicking a file in Explorer, then you'll
find the Send To file now includes all your main user folders:
Contacts, Documents, Downloads, Music and more. Choose any of these and
your file will be moved there immediately.
78. Create folder favourites
If
you're regularly working on the same folder in Explorer then select it
in the right-hand page, right-click Favourites on the left-hand menu,
and select Add to Favourites. It'll then appear at the bottom of the
favourites list for easy one-click access later.
79. Disable hibernation
By
default Windows 7 will permanently consume a chunk of your hard drive
with its hibernation file, but if you never use sleep, and always turn
your PC off, then this will never actually be used. To disable
hibernation and recover a little hard drive space, launch REGEDIT,
browse to HKEY_LOCAL_MACHINE\SYSTEM\CurrentControlSet\Control\Power,
then set both HibernateEnabled and HiberFileSizePerfect to zero.
80. Create a new folder shortcut
When
you need to create a new folder in Windows 7 Explorer, don't reach for
the mouse. Just press Ctrl+Shift+N to create the folder in the active
Explorer window, then type its name as usual.
81. Open a jumplist
Most
people right-click a Windows taskbar icon to view its jumplist. You can
also hold the left mouse button over the icon, though, then drag
upwards to reveal the jumplist and choose the option you need, a more
natural action that should be just a little faster.
82. Search quickly
If
you'd like to search for something in an Explorer window then there's
no need to use the mouse. Simply press [F3] to move the focus to the
search box, enter your keyword and press [Enter] to run the search.
83. Search file contents
There's
no obvious way in the Windows interface to search the contents of files
that haven't been indexed, but all you need to do is start your search
with the "content:" search filter. So entering content:Microsoft , for
instance, will find all documents (whether they're actually indexed or
not) that contain the word Microsoft.
84. Close in a click
Hover
your mouse cursor over a Windows taskbar button will display a preview
thumbnail of that application window. You don't need that app any more?
Then middle-click the thumbnail to close it down.
85. Leave the Homegroup
Homegroups
are an easy way to network Windows 7 PCs, but if you don't use the
feature then turning it off can save you a few system resources.
Click
Start, type Homegroup, and click "Choose homegroup and sharing
options". Click Leave the Homegroup > Leave the Homegroup >
Finish.
Now click Start, type services.msc and press [Enter] to launch the Services Control Panel applet.
Find
and double-click both the HomeGroup Listener and HomeGroup Provider
service, clicking Stop and setting Startup Type to Disabled in each
case, and the services won't be launched when you need reboot.



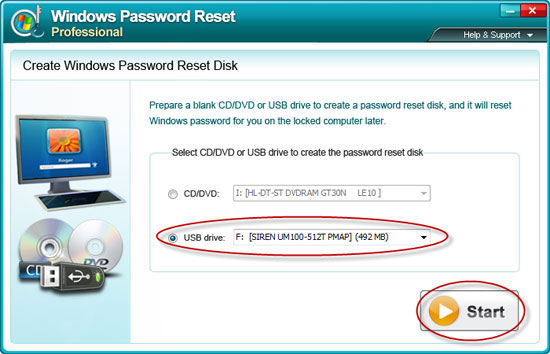
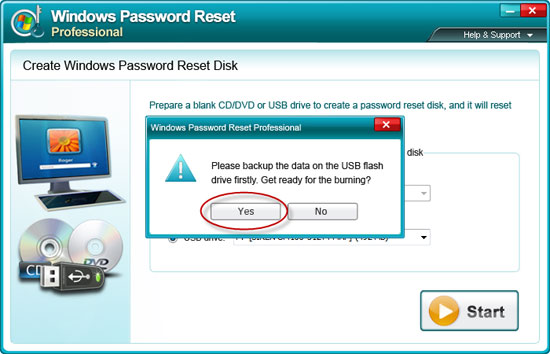
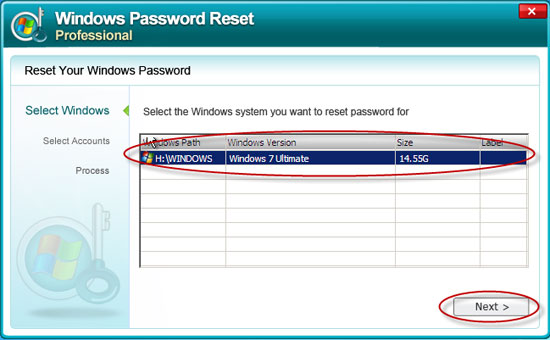
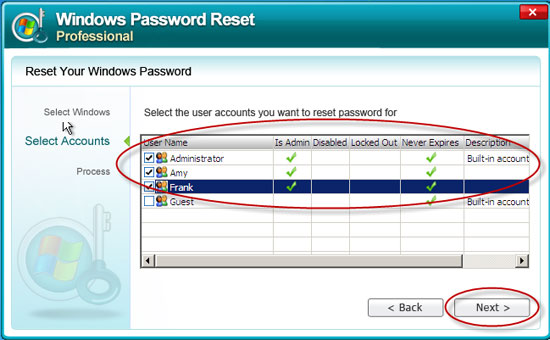
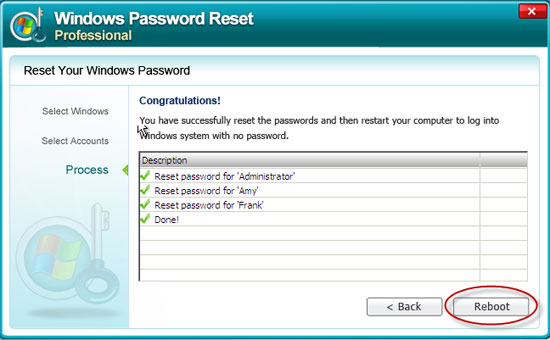


 http://linux-mac-windows.blogspot.com/2012/08/how-to-hack-password-on-windows-7-with.html